Outdoor Gear Reviews, Tips & Adventure Stories to Inspire an Outdoor Life

Tag: Overlanding

Hands-On Review: Renogy 200Ah Lithium Iron Phosphate Battery

Renogy 200Ah Lithium Iron Phosphate Battery unboxed

Outdoor adventures, whether it’s camping, van life, sailing, or off-grid travels, often require a reliable source of power to keep devices charged and essential equipment running smoothly. In recent years, lithium iron phosphate (LiFePO4) batteries have gained popularity due to their superior performance, longer lifespan, and enhanced safety features compared to traditional lead-acid batteries. Among the top contenders in this category is the Renogy 200Ah Lithium Iron Phosphate Battery. For our Renogy lithium battery review, we put the Renogy 200Ah LiFePo4 to the test.

We installed 2 Renogy 200Ah Lithium Iron Phosphate Batteries in our 46ft sailboat, Gratitude, and after 5 months of use, we’re giving you an inside look at how these batteries have performed. In this hands-on review, we’ll dive deep into the features and performance of the Renogy 200Ah Lithium Iron Phosphate Battery, examining its suitability for outdoor enthusiasts seeking a robust and versatile power solution.

Renogy 200Ah LiFePO4 Battery installed
Our 2 200Ah LiFePO4 batteries made for a clean installation in our 46ft sailboat.

Throughout this Renogy lithium battery review, we’ll explore the design and build quality of the Renogy 200Ah Lithium Iron Phosphate Battery, assessing its durability and ease of use in demanding outdoor conditions. We’ll also take an in-depth look at its performance, examining its capacity, charging and discharging efficiency, and overall power output.

Additionally, we’ll delve into the battery management system (BMS) and safety features integrated into the Renogy battery – important features for peace of mind during your adventures. We’ll also evaluate the battery’s Bluetooth connectivity and let you know how monitoring your battery from your phone works in real-life.

To put these batteries through their paces, we’ve had them running our sailboat’s main 12V power system with a number of power-hungry electronics. Now that we’ve spent some time with these batteries, we can share with you how they’ve worked for us and help you decide if they are right for your needs.

The Verdict

4.5 out of 5 Stars

We LOVE our Renogy 200A LiFePO4 batteries! Their simple, but slick design cleaned up our battery compartment.  They have performed much better than our previous lead-acid batteries and with the increased depth of discharge, give us more usable power overall.  We are obsessed with connecting to the batteries via Bluetooth to see exactly what’s happening on each battery.  We love them so much that we’re already working on adding them to our Overland Trailer. Our only hiccup with these batteries is that we have experienced some misreporting of the capacity status using the DC Home app.

Buy Now at Renogy’s Website

12V 200Ah Lithium Iron Phosphate Battery w/ Bluetooth

12V 200Ah Lithium Iron Phosphate Battery w/ Bluetooth

Buy Now at Renogy.com


Overview of the Renogy 200Ah Lithium Iron Phosphate Battery

Renogy 200Ah Lithium Iron Phosphate battery in the box
Our Renogy LiFePO4 batteries arrived and ready for install.

Renogy has established itself as a serious brand in the off-grid power space, specializing in solar panels, inverters, and batteries. With a focus on innovation and reliability at affordable prices, Renogy has gained the trust of outdoor enthusiasts and off-grid adventurers worldwide.

The Renogy 200Ah Lithium Iron Phosphate Battery is yet another Renogy product that shows their commitment to delivering high-quality off-grid power solutions. In this battery, Renogy has packed 200Ah of LiFePO4 storage with a battery management system (BMS) and Bluetooth built-in. Its impressive capacity of 200Ah provides ample power for extended periods, reducing the need for frequent recharging. When paired with solar panels, the time you could spend off the grid is limitless.

The Renogy 200Ah Lithium Iron Phosphate Battery packs a range of features that make it an appealing choice for RV, marine, van, and off-grid applications. The lithium iron phosphate (LiFePO4) chemistry provides several advantages, including a longer lifespan, faster charging, and increased safety compared to lithium-ion battery technology.

The battery’s compact and lightweight design makes it easy to transport and install in various setups, whether it’s installed in an RV, van, camper, boat, or an off-grid cabin. Its dimensions and form factor have been optimized for space efficiency while maintaining robustness and durability.

The feature that sets the Renogy 200Ah apart from other similar batteries is its baked-in Bluetooth technology.  Using Renogy’s DC Home app (free), you can monitor your Renogy battery in real time.  Being able to know exactly what is happening to your battery at any moment helps troubleshoot issues with your electrical system and gives you peace of mind when it’s functioning smoothly.

By familiarizing ourselves with the key features, specifications, and market positioning of the Renogy 200Ah Lithium Iron Phosphate Battery, we can proceed to examine its design, build quality, and performance in subsequent sections. Join us as we delve deeper into the intricacies of this battery and discover what sets it apart from the rest.

Design and Build Quality

Physical design and dimensions
Insert terminals on a 200Ah LiFePO4 battery
The insert terminals on the Renogy make for an easy and flexible installation.

The design of a battery plays a crucial role in its usability and integration into various setups. The Renogy battery’s design aims to strike a balance between compactness and functionality. Renogy’s battery design is simple – a solid black plastic box with 2 posts.  That’s it.  We appreciate the lack of extra curves and cutouts that often cause batteries to collect gunk and make them difficult to clean. Not that you’ll be cleaning your batteries much, but it is nice to have a clean and tidy battery box when showing off your new LiFePO4 batteries.

The Renogy clocks in at 60.2 lbs, which is lighter than our old lead-acid batteries weighing 88 lbs each.  The lighter weight made it a lot easier to install the Renogys than it was to remove the old batteries.

Specifications:
  • length: 20.55″
  • width: 9.45″
  • height: 8.62″
  • weight: 60.2 lbs

Durability is a crucial aspect when choosing a battery for off-grid adventures. Our batteries are strapped down deep in the bilge of our sailboat, so they won’t be taking a beating.  In our case, the IP65 rating means our battery will be protected against everything it will see on our boat. IP65 means that it’s dustproof (the 6) and is protected against light water pressure (the 5).

Renogy 200Ah Lithium Iron Phosphate battery handles
You’ll find handles on each end of the battery that can be easily stowed away once installed.

The Renogy is rated to charge in temperatures from 32-131°F and it’s rated to discharge in temps from -4-140°F – meaning you won’t be out of luck trying to use it to power your stuff in the desert heat or icy winter camping.  This battery does not have a self-heating function like some competitors – so if you plan to use it in cold areas that routinely get below 32°F, you may want to choose a heated battery instead.

While lighter than many batteries of this capacity, the 60lb Renogy battery still isn’t really made for portable use.  It’s heavy enough to demand a solid and permanent mounting location, but it’s light enough to lighten your vehicle load or to save your back a bit while installing. This battery has 2 solid handles at each end to make carrying these less awkward.  The handles stow away into the side of the battery when not needed.

The terminals on this battery are insert terminals, also known as internal threads, and come with 2 M8 bolts.  Out of the box, the Renogy 200Ah comes with 1″ M8 bolts installed, but longer 1.25″ bolts are also included.

Performance and Power Output

The most important aspect of a battery is its capacity and energy storage capabilities. With 200Ah of capacity, the Renogy can charge at up to 100A continuously – leading to ultra-fast charges if you have a beefy charger.  Our batteries arrived at 80% capacity and our 30A charger had them full in under 3 hours.

Renogy DC Home App interface
Renogy’s DC Home app allows you to view data from your Renogy devices via Bluetooth connections.

As far as output, this battery is rated to discharge continuously at up to 200A – valuable for applications that need high power available when required.  The electric winches and anchor windlass on our boat require about 150A to operate under high loads and the Renogy 200Ah LiFePO4 handles them all without issue.  These power-hungry devices typically only operate for short periods of time so the 200Ah capacity isn’t an issue, but the 200A continuous output is a necessity for them.

For most of the 5 months of our testing for this Renogy lithium battery review, they’ve been tasked with powering our day-to-day appliances on the boat.  2 12V refrigerators and a 12V freezer are the biggest power hogs in our system – with the two fridges consuming up to 140Ah of power per day when running nonstop.  The Renogy 200Ah battery has handled these without issue, but with only the 400Ah of capacity these provide, it’s vital to our system that when we’re away from the dock, we’re conserving our power usage.

When we do need to lean on the batteries for a few days at sea, the 80% depth of discharge (DoD) of these batteries is a valuable spec.  LiFePO4 batteries can be discharged up to 80% of their capacity without damaging the battery or shortening its life.  Comparing this to the 50% recommended DoD of lead-acid batteries, LiFePO4 batteries give you more usable power than lead-acid batteries of the same capacity. For example, a 200Ah lead acid battery can only be discharged to 100Ah, but a 200Ah LiFePO4 battery can be discharged to 40Ah – giving you 60 additional amp hours for your system to use.  That’s 30% more power!

Renogy Battery Monitor
Our Renogy battery monitor helps to verify the data coming out of the DC Home app.

In our boat, we have a Renogy Battery Monitor installed that gives us another source of data to check the Bluetooth battery information against. As we powered up and powered down various devices, we were able to view the charging and discharging on each battery and verify that the numbers were consistent with the Renogy battery monitor. The best data the DC Home app gives when connected to the battery is current capacity.  It’s important to know exactly where you’re battery capacity is at – especially on longer trips.  The Bluetooth connectivity gives you the ability to check your capacity at any time.  If you’re like us, you’ll check it every 10 minutes at first because having the data at your fingertips is just too cool to resist.

While we do not have the equipment or know how to properly test the capacity of our batteries, we can verify that the capacity reading via Bluetooth corresponds closely with our actual power usage.

As mentioned previously, the 100A maximum continuous charge rate on these batteries means they can be charged fast.  We recommend a 60A or above charger to take full advantage of this feature and to be able to charge in record time.

The Renogy is rated to last 2000 cycles – meaning it can be charged and discharged (up to 80% DoD) 2000 times before losing performance or capacity. Compare this to the 500-1200 cycles you’ll get from lead-acid batteries and you’ll see how this Renogy battery will last a lot longer.

Since this is a 12-volt battery, it operates between 10-14.8 volts and prefers to be charged at 14.4 volts.  When the battery reads higher than 14.8V or lower than 10 volts, it will trigger overvoltage or undervoltage warnings on the DC Home app.

Safety Features

Battery Management System

Encased somewhere inside the shiny black rectangle that is the Renogy 200Ah LiFePO4 battery is an advanced battery management system (BMS) that intelligently monitors the battery’s operating conditions and oversees its safe operations.  The main benefit of a BMS is that it manages and redistributes temperature across the battery cells to maintain consistent temperatures to optimize battery performance.  The BMS also aids in efficiently charging the battery to speed up charges and get the most out of your charging source. In Renogy’s case, the BMS also reports some of its data vis the DC Home app to give you even more data and control over your battery.  Battery error messages, temperatures, and individual cell voltage can all be easily viewed in the DC Home app.

Auto-balancing Function

The Renogy 200Ah battery has an auto-balancing function that monitors and equalizes the voltage across the individual cells. When multiple Renogy batteries are connected in parallel, this function ensures all batteries will equally charge optimizing and speeding up the charging process.

Energy Saving Mode

When stored or not used, batteries lose their charge over time.  Renogy has given their LiFePO4 batteries an energy-saving mode which it switches to if not charged or discharged for 24 hours. When in this mode, the battery will only lose 3% per month – meaning you’ll have more power available when you’re ready to put it back into use.

Bluetooth Connectivity

The Renogy 200Ah Lithium Iron Phosphate battery includes Bluetooth connectivity allowing you to monitor the current status of your battery via Renogy’s DC Home app on a smartphone or tablet.

in our Renogy lithium battery review, we were able to boot up the Renogy DC Home app on our iPhone and connect to our batteries easily. The DC Home app shows the following battery data

  • Battery data on DC Home app
    The battery data available via the DC Home app.

    Battery Level (percentage)

  • Total Max Capacity (in Ah)
  • Present Capacity (in Ah)
  • Present Voltage (in V)
  • Present Current (in A)
  • Heating Module status (this battery not equipped)
  • Firmware Version
  • Error (messages)
  • Maximum Temperature
  • Minimum Temperature
  • Cell Voltage

Bluetooth on this battery works really well.  We had no problem connecting our batteries once installed.  After downloading the DC Home app and opening it, our new batteries were found and we could add them to the app.  Once added, the battery (or batteries) in our case show up each time the DC Home app is opened.

Our only real gripe with the DC Home app is that the added devices drop the connection each time you browse away from the app, forcing you to refresh the devices once you go back to the DC Home app.  While we wish the Bluetooth connection would remain even when checking our messages or emails for a minute, we assume that Renogy designed this Bluetooth functionality intentionally to save power on your devices and phone.  It’s not that big of a deal – but can be frustrating constantly having to refresh the devices when observing battery data over time.

The only other issue we’ve experienced during our Renogy lithium battery review is that we once arrived to our boat after some time away to find our batteries reading around 50% battery level via the DC Home app.  Our boat is constantly being charged via a 110V/30A charger and we were concerned to find that the batteries were at half capacity and seemingly not being charged.  Checking the battery charger, we found it in floating (maintenance) mode even though our batteries needed a fuller “boost” charge to get to full capacity.  After powering our battery charger on and off a few times, the battery capacities both changed to show a full charge at 100% battery level.  Apparently, our batteries were being properly charged while we were away, but for some reason, the capacity was not reflecting the charging on the DC Home app.  While this is less of a problem than our batteries actually being at 50%, this experience will leave us wondering if the battery level is correct each time we arrive back at our boat.  Luckily, we can verify battery levels via the Renogy Battery Monitor if this problem occurs again.

All in all, having the Bluetooth functionality is worth some occasional bugs, and we’re hopeful that over time, Renogy will release new battery firmware to fix these types of issues.  Using the DC Home app is generally a pleasant experience and we’re thankful to be able to monitor our Renogy batteries and other devices.  We do wish we could view our data over the internet and not just when we’re near our Renogy devices.  Renogy has recently released the Renogy One that locally connects to your devices via Bluetooth and then makes the data available anywhere over the internet.

Pros and Cons of the Renogy 200Ah LiFePO4 battery

Pros

  1. High capacity: The 200Ah capacity provides ample power for extended periods, reducing the need for frequent recharging.
  2. Long lifespan: The lithium iron phosphate chemistry offers a longer lifespan of 2000 cycles compared to other battery types, ensuring lasting reliability.
  3. Fast charging: The battery’s fast charging capability minimizes downtime and allows for more efficient power replenishment.
  4. Compact and lightweight: The battery’s compact design and lightweight nature make it easy to transport and install in various setups.
  5. Comprehensive safety features: The built-in Battery Management System (BMS) and additional safety features ensure safe operation and protection against potential hazards.
  6. Bluetooth connectivity: Via Bluetooth and the DC Home app, the battery offers convenient monitoring capabilities.

Cons

  1. Higher cost: Lithium iron phosphate batteries are generally more expensive upfront compared to traditional lead-acid batteries, though they offer long-term cost savings. The Renogy battery is less expensive than many similar LiFePO4 batteries.
  2. Weight: While the battery is designed to be compact and lightweight, it still has a significant weight due to its capacity, which may affect portability for some users.

2x 200Ah LiFePO4 batteries installed

Renogy Lithium Battery Review: Is It Worth It?

The Renogy 200Ah Lithium Iron Phosphate Battery is a solid option for those looking to upgrade their battery bank. While expensive, its longer lifespan and increased usable power due to a higher depth of discharge make it comparable to less expensive batteries in the long-term.

The Renogy 200Ah Lithium Iron Phosphate Battery has demonstrated several notable strengths. Its high capacity provides ample power for extended periods, while the long lifespan ensures reliable performance over time. The fast charging capability minimizes downtime, and the compact, lightweight design enhances portability. The battery’s comprehensive safety features, including the Battery Management System, Auto-balancing Function, and Energy Saving Mode offer peace of mind during operation. Moreover, the Bluetooth connectivity makes it a high-tech option that lets you keep track of where your battery is at from the palm of your hand.

We hope this review has been informative and helpful in your search for a reliable power solution. Whether you’re embarking on off-grid adventures or seeking a backup power source, the Renogy 200Ah Lithium Iron Phosphate Battery has proven to be a versatile, efficient, and affordable option. If you choose the Renogy 200Ah Lithium Iron Phosphate battery for your RV, van, boat, or off-grid cabin, we’re confident it will power your systems for years to come and that you’ll be glad you went with Renogy.

Have thoughts or questions about our Renogy lithium battery review?  Let us know in the comments.

Buy Now at Renogy’s Website

12V 200Ah Lithium Iron Phosphate Battery w/ Bluetooth

12V 200Ah Lithium Iron Phosphate Battery w/ Bluetooth

Buy Now at Renogy.com

Off the Beaten Path: A Beginner’s Guide to Overlanding

What's Overlanding?
What’s Overlanding? We like to think of overlanding as car camping without the campgrounds.

Have you ever wanted to experience the freedom of the open road and explore the world on your own terms? If so, overlanding may be the perfect way for you to do it. What’s overlanding? Overlanding is a type of travel that involves self-reliant, off-road adventure in a vehicle, usually a four-wheel drive. This type of travel allows you to experience remote and untouched destinations, away from the typical tourist crowds.

Overlanding has been gaining popularity in recent years, and for good reason. It offers an opportunity to explore new places, meet new people, and challenge yourself in ways you never thought possible. In this beginner’s guide, we’ll take a closer look at what overlanding is, what it involves, and how to get started. Whether you’re a seasoned traveler or someone looking for a new adventure, this guide will give you the information you need to plan your own overlanding trip. So buckle up and let’s hit the road!

Understanding Overlanding

What’s overlanding? Overlanding is a form of outdoor exploration that involves self-reliant, off-road adventure in a vehicle. Unlike traditional road trips, overlanding often involves remote and challenging terrains that require a certain level of skill and experience. The goal of overlanding is to explore new and untouched destinations, away from the typical tourist crowds.

We like to think of overlanding as car camping without the campgrounds. How far off the beaten path you travel to get to your camping destination is up to you and the ability of your vehicle. While similar in many ways to car camping, there are some key characteristics of overlanding that differentiate it from other forms of outdoor exploration:

Self-reliance

Overlanding requires you to be self-sufficient, meaning you need to carry all the supplies and equipment you’ll need for the journey. This includes everything from food and water to shelter and tools. Another aspect you’ll need to consider when overlanding is how you’ll use the bathroom while in remote spaces. For more information, check out our article on bathroom off-grid options.

Overlanding in remote places
Overlanding allows you to enjoy the outdoors in remote spaces not often visited
Off-road travel

Overlanding often involves traveling on unpaved roads and rugged terrains that require a four-wheel drive or other specialized vehicle. All-terrain tires are also a good idea.  But even if you don’t plan to tackle difficult terrain while overlanding, a vehicle with high ground clearance is a good idea.

Remote destinations

Overlanding is all about exploring new and untouched destinations that are far away from the typical tourist hotspots. This often means traveling to remote areas that are difficult to access. The difficulty in accessing these areas is what makes overlanding so special – being able to enjoy wild spaces that not many others have.

Adventure and challenge

Overlanding is not for the faint of heart. It requires specialized equipment, a certain level of skill and experience, and a willingness to take on challenges and overcome obstacles. The adventure lies in getting to your remote destination and learning to appreciate your ability to be self-sufficient.

While overlanding has gained popularity in recent years, it’s not a new concept. In fact, overlanding has been around for centuries, with early explorers and pioneers traveling across vast distances in search of new lands and opportunities.

Planning an Overlanding Trip

Planning an overlanding trip requires careful consideration of several key factors. Here are some important things to keep in mind when planning your trip:

  1. Choosing a destination: The first step in planning an overlanding trip is to choose a destination. Consider what type of terrain and scenery you’re interested in exploring, and whether you want to stay close to home or venture further afield. We like to use Campendium to find free camping areas on public lands in the US.
  2. Deciding on the route: Once you’ve chosen a destination, it’s time to decide on the route you’ll take. Consider factors such as the terrain, the time of year, and the availability of fuel and supplies. It’s a good idea to also consider a backup route or two in case your primary route choice is closed or unpassable.
  3. Considering the time of year: The time of year you plan to travel can have a big impact on your overlanding trip. For example, if you plan to travel during the rainy season, you’ll need to take extra precautions to ensure your vehicle is equipped to handle muddy roads. Overlanding during the winter season can provide amazing opportunities to experience nature in rugged isolation, but you’ll need extra preparation to make sure you stay warm enough.
  4. Planning for fuel, food, and water: You’ll need to carry all the supplies you’ll need for the journey, including fuel, food, and water. Make sure to plan ahead and carry enough supplies to last the duration of your trip.
  5. Preparing the vehicle: Overlanding requires a four-wheel-drive vehicle that’s equipped to handle rough terrain and challenging conditions. Make sure your vehicle is in good condition and properly equipped with the necessary gear, such as all-terrain tires, a winch, and recovery equipment.

By carefully planning your overlanding trip, you can ensure that you have a safe and enjoyable experience. Proper preparation is key whenever you travel away from the security of stores, gas stations, and emergency services.

Overlanding rooftop tent ona jeep
Whether you choose to equip your vehicle with a rooftop tent or prefer to pitch a traditional tent once you arrive at your destination, a weath of overlanding equipment options are available.

Essential Gear for Overlanding

When embarking on an overlanding trip, it’s essential to have the right gear to ensure your safety and comfort. Here are some essential items you should consider bringing on your trip:

  1. Navigation tools: When traveling off-road, it’s important to have reliable navigation tools, such as a GPS device or map and compass.
  2. Communication devices: In case of emergencies, it’s important to have a reliable means of communication, such as a satellite phone or radio. We recommend carrying a satellite communicator when traveling to remote places without cell phone coverage.
  3. Recovery gear: Overlanding often involves traversing rugged terrain, so it’s important to have recovery gear, such as a winch, recovery straps, and a shovel, to help you get unstuck if you get stuck in mud, sand, or snow. The level of recovery gear you’ll need will be related to how deep into the wild you plan to go. What’s overlanding without getting stuck from time to time? When it happens, make sure you have the tools and equipment you’ll need to get back on the trail.
  4. Camping equipment: When overlanding, you’ll need to carry all the equipment you’ll need for camping, such as a tent, sleeping bag, and camping stove. The overlanding industry has exploded in recent years with a variety of tools and equipment made for overland camping. Whether you choose to equip your vehicle with a rooftop tent or prefer to pitch a traditional tent once you arrive at your destination, a myriad of options are available to fit your preferences. We’ve purchased a lot of great and affordable overlanding gear from Overland Vehicle Systems in the past.
  5. Tools and spare parts: It’s important to carry a basic toolkit and spare parts for your vehicle, such as spare tires, oil, and fuses, in case of mechanical issues.
  6. First aid kit: Accidents can happen, so it’s important to carry a well-stocked first aid kit that includes essentials like bandages, antiseptic, and pain relievers. We like the carry the Mountain Series Explorer Medical Kit along on our trips overland.
  7. Water and food storage: Overlanding often takes you to remote areas, so it’s important to carry enough food and water for the duration of your trip, as well as storage containers to keep them fresh.

By packing these essential items, you’ll be well-prepared for your overlanding trip and can focus on enjoying the adventure. Making sure you have the right gear can save you from disaster while off the grid.

Safety Precautions

Overlanding can be an exciting and rewarding adventure, but it’s important to take the necessary precautions to ensure your safety. Here are some important safety considerations for overlanding:

  1. Vehicle maintenance: Before embarking on your trip, make sure your vehicle is in good condition and has been properly maintained. Check the tires, brakes, and fluids, and make any necessary repairs or adjustments.
  2. Driving cautiously: When overlanding, it’s important to drive cautiously and be aware of your surroundings. Stay alert for hazards like rocks, mud, or water crossings, and take your time when navigating difficult terrain.
  3. Packing essential safety gear: Make sure to pack essential safety gear, such as a first aid kit, fire extinguisher, and emergency communication devices, to help you stay safe in case of emergencies.
  4. Knowing the local laws and customs: When traveling in a foreign country or unfamiliar territory, it’s important to understand the local laws and customs to avoid any legal or cultural misunderstandings.
  5. Being aware of wildlife: When traveling in remote areas, it’s important to be aware of the local wildlife and take necessary precautions to avoid any dangerous encounters. Be careful not to disturb the habitats of the local wildlife as you’re passing through.
  6. Keeping in touch with others: Make sure to keep in touch with family or friends back home and let them know your itinerary and expected return date. This way, they can check in on you and alert authorities if necessary.

By taking these safety precautions, you can help ensure that your overlanding trip ends with a successful return home and many memorable moments.

Overlanding Etiquette

Beautiful view above the clouds while overlanding.
Overlanding provides unique opportunities to experience nature in its fullest beauty.

Overlanding is a unique way of exploring the outdoors, but it’s important to remember that it’s not a free-for-all. Here are some important overlanding etiquette tips to keep in mind:

  1. Stay on designated trails: It’s important to stay on designated trails to avoid damaging the environment and preserve the natural beauty of the area.
  2. Leave no trace: When camping, make sure to pack out all your trash and leave the campsite as you found it. This helps preserve the natural environment for others to enjoy.
  3. Respect private property: Make sure to respect private property and obtain permission from landowners before entering their property.
  4. Be mindful of noise: When camping in remote areas, it’s important to be mindful of noise levels and avoid disturbing the peace and quiet of the area.
  5. Yield to other vehicles: When encountering other vehicles on the trail, yield to the vehicle going uphill, as they have the right of way.
  6. Be considerate of other campers: When camping near others, be considerate of other campers and keep noise levels down, especially at night.

By following these overlanding etiquette tips, you can help preserve the natural environment and ensure a positive experience for all.

Get Out There and Overland

Overlanding is a unique and exciting way to explore the outdoors, but it’s important to approach it with the right mindset and be prepared for the challenges it may present. By understanding the basics of overlanding, planning your trip carefully, and bringing the right gear, you can ensure a safe and enjoyable experience.

Remember to take necessary safety precautions, follow overlanding etiquette, and be respectful of the natural environment. With the right approach, overlanding can be an unforgettable adventure that allows you to connect with nature and explore the world off the beaten path.

How to Conduct an Energy Audit on a Recreational Vehicle

RV Energy Audit
An energy audit can help determine the energy efficiency of your electrical system and make sure it’s sized appropriately

When exploring wild spaces in an RV, van, travel trailer, or boat, it’s important for your vehicle to have an electrical system that will keep your systems running for the duration of your trip.  If your vehicle’s electrical system isn’t up to the task or if you want to upgrade your power capabilities, it’s vital to start with an energy audit. A complete energy audit will provide important information about your electrical system to help you make the right choices for your vehicle, usage, and budget.

What is an Energy Audit?

An energy audit is a comprehensive inspection of your energy typically usage used to determine ways to conserve energy or to properly size power systems.  In your home, you may hire a professional to conduct an energy audit to look for opportunities to save energy or to size a solar system.  For an RV, van, travel trailer, or other off-grid outdoor vehicles, an energy audit can help you determine the size of batteries or the number of solar panels you need.

Conducting an energy audit looks at all of your electronic devices, how much you use them, and helps establish a target amount of power you’ll need to power your devices.  For recreational vehicles, this target power number is usually calculated in amp hours per day. For example, you might conduct an energy audit and determine that when you’re boondocking, or camping off-grid, your RV typically uses 50 Ah of power per day.

Benefits of Conducting an Energy Audit on your RV, Van, or Travel Trailer

1. An Energy Audit Determines Your Power Storage and Power Generation Needs

Each of us uses power differently. Some vigilantly turn off lights and other devices when they aren’t in use.  Others prefer to have every electronic luxury all going at the same time.  Conducting an energy audit on your RV, van, travel trailer, or boat based on how you use it will calculate your unique power needs.  Once you know how much power you use, you can ensure your batteries, solar panels, or generator are sized appropriately.

2. An Energy Audit helps you Better Understand your Electrical System

Whether you purchase an RV or build your own electrical system for your van, it’s important to know how your electrical system is designed and how much each device uses.  An energy audit provides you with this information per device.

3. An Energy Audit Identifies What Devices Should be Upgraded to be More Energy Efficient

Knowing what each device in your electrical system consumes lets you make better decisions about your system.  Discovering which devices consume a large percentage of your power will help identify which device upgrades will save the most power and allow you to extend your trips.

How to Conduct an Energy Audit

Step 1: Measure the Current Draw of Each of your Devices

Most RV, van, travel trailer, or boat electrical systems have a battery monitor.  Some smaller or older systems have only a voltage meter (voltmeter) – allowing you to “guess” your battery capacity percentage based on the voltage of your batteries.  To conduct an energy audit, a voltmeter won’t do the trick.  You’ll need a device that can measure the current (in amps) of each device.

Renogy 500A Battery Monitor with Shunt
The Renogy Battery Monitor measures your current draw (in amperage) of your electrical system

If you don’t have a system monitor that can measure amperage draw, we recommend picking up Renogy’s 500A Battery Monitor (Read our full review of the Renogy Battery Monitor). At under $100, Renogy’s battery monitor includes a shunt that you install between all of your devices and your battery.  This shunt measures the amount of current draw coming out of your battery in real time and displays the result on the battery monitor screen.

Turn off all devices in your system

To measure the current draw of each device, start by turning off all devices in your system.  Once all devices have been turned off, your battery monitor should be reading at or near 0 Amps.  If your monitor doesn’t read 0 Amps with all devices turned off, check to make sure you haven’t forgotten any.  If after double-checking, you still have some current draw in your system, don’t worry.  This small amount of power may simply be “parasitic loss” – a small amount of power that your system draws even when off.  If your number is more than zero, simply make note of the amount and subtract it from your measurements of each device.

Measure each device

Once you have all devices off, turn one device on and measure its current draw in amps.  It’s helpful to have a spreadsheet handy for this step to record your measurements.  Make a list of each device in your system and record its current draw in amps next to it.  We’ve created a simple spreadsheet to get you started –download it here. You can add and level each device in the first column and record its current draw in the ‘amperage” column.

Download our Energy Audit Spreadsheet

DIY Energy Audit Spreadsheet
Download our Energy Audit Spreadsheet to record your device readings and to calculate your total system usage.
Step 2: Determine How Much You Use Each Device Per Day

Now that you’ve identified how much power each device in your system uses when it’s on, you’ll need to note how much time you use each device for.

Add your daily usage (in hours) to the spreadsheet under the “hours used per day” column. For devices that are on all the time, like a refrigerator, coming up with these numbers is easy.  For intermittent devices, like a water pump, try to project how many minutes you’re water pump is on per day. If you typically use your water pump 10 times per day for an average of 1 minute, then you use your water pump for 10 minutes per day or .167 hours per day.

Imagine an average day

When determining how many hours per day you use each device, we recommend thinking about an average day. – not a day of heavy use for a particular device. For example, use usage numbers from a typical sunny day where you don’t use your lights during the day as opposed to a dark, stormy day where you might use interior lighting during the day.

Error on the high side

To determine your power needs, don’t cheat these numbers. The end result of your energy audit is the projected daily usage total of your system.  If you typically use lights for 4hrs/day but want to cut back to 2/hrs per day to save power, enter the higher number for this exercise.

An electrical system that is bigger than you need is better than one that is less than you need – provided you have the budget. If you are going to guess on your usage, guess on the higher side.

Step 3: Establish your daily usage numbers

To establish how much power each device in your system uses per day, multiply the amperage of the device by the number of hours it will be used each day.

Amperage X Hours/Day = Total Amp Hours per Day

If you’re using our spreadsheet, it will do the math for you for each device.  In the “Total Ah/day” column, you’ll discover the amount of power each device listed uses in your system.  Because batteries are usually labeled in amp hours (Ah), keeping your energy audit recording in Ah will help more easily determine how your usage stacks up against your storage capacity.

Once you have your daily Ah totals for each device, add them all together to discover your total system needs per day in Ah.  If you are using our spreadsheet, you’ll find this number at the bottom in green and labeled “Total System Ah/day”.

DuFour 460 Grand Large 12V Switch Panel
Using your vehicle’s 12V switch panel, turn on each device individually to measure its current draw

Now That You Know Your Daily Power Needs, You Can Make Better Decisions About the Future of Your System

Now that you know your usage, you can compare that number to your battery capacity.  If you have a 200Ah battery bank, 200Ah of storage divided by 50Ah of daily usage will give you 4 days of power before needing to recharge. If you want to extend the time you can camp off-grid, you may look at adding a solar system.  Let’s say you want to target a camping duration of 7 days with your system. For the 3 additional days, you’ll need to generate an additional 150Ah of power. Having 7 days to generate 150Ah of power means you’ll need a solar system that can generate around 21.5 Ah per day.

Knowing your daily power usage may indicate that you need to add to your battery bank or, if that’s not possible, reduce your power usage by using higher-power devices less each day.  If your current electrical system doesn’t fit your power needs, you only have 2 options:

  1. add more power (storage capacity with batteries, charging capacity with solar, generator, etc)
  2. decrease your power usage (limit your usage, shorten your trip durations, etc)

There are a lot of ways to accomplish either (or both) items above.  In the end, you’ll need to decide what alterations your electrical system needs based on your needs and your budget.  By conducting an energy audit, you’ll now know exactly how much power each device in your system draws, your daily system usage, and how you’re system should be sized.  You’ll have a lot more useful information to make informed decisions to improve your electrical system and to save money in the process.

Download our Energy Audit Spreadsheet

The Outward Overland Trailer: Electrical System Design & Diagram

Electrical System in the Outward Overland Trailer

Jump to the Outward Trailer Wiring Diagram

We purchased a custom off-road trailer to use as a platform to build the perfect overland trailer. We’ve spent the past few years adding an electrical system, a water system, a pull-out kitchen, and a roof rack system to complete the build. In this post, we’ll share the design decisions and wiring diagram of our overland trailer electrical system. To learn more about our overland trailer build, visit the first post in our Outward Overland trailer Series.

Getting Started

Outward Overland Trailer Build Before
The Outward Overland Trailer As We Bought It

We started by calculating our power needs by conducting an energy audit based on our projected electrical needs. To conduct an energy audit, you determine the power draw (in amps) of each electric component in your system and multiply the amount of power of each device by the time per day (in hours) you plan to use it. This gives you a list of projected amp hours (Ah) you’ll use each device per day. Add them together and you have your projected daily Ah usage.

Our list of desired electrical systems included a pressurized water system with hot water, a 12v refrigerator, and lighting throughout the various trailer compartments. Conducting our energy audit on our planned usage, we determined we would use about 20 amp hours of power per day. Our experiences with an airstream trailer in the past confirmed that 20Ah per day was a good target to shoot for.

Planning our 12V Electrical System

Once we had our target daily usage of 20Ah, we could then begin to size our power storage and recharging systems. We determined that an average trip using our overland trailer would be about 3 days – mostly long weekends. 3 days of 20Ah of power usage meant that we needed at least 60Ah of battery storage. When it comes to batteries, more is always better providing the budget and space allow. With that in mind, we upped our desired battery bank size to 100Ah – giving us the potential to spend 5 days out in the wild without needing to recharge.

In terms of recharging our batteries, we first needed a way to recharge them when we returned home to the power grid. We landed on a 10-amp 120V battery charger for recharging the batteries at home. We also wanted the ability to recharge the batteries with solar panels. We calculated that adding around 200 watts of solar would give us between 20Ah to 50Ah of charging capability per day, depending on conditions.

With these numbers, we began purchasing the best components to fit our build.

Main Electrical System Components

Batteries

Batteries are typically the single largest purchase in your electrical system. On a budget, we purchased two 6V 210Ah “golf cart” batteries from Costco. Needing to get these 6V batteries to output 12V, we wired them in series to double the voltage to 12V and keep the amp hours at 210Ah. These golf cart batteries are traditional wet cell deep cycle batteries (not AGM or Lithium Ion) which shouldn’t be discharged to less than 50% of capacity to maintain the health of the battery. So 210Ah at 50% depth of discharge would give us 105Ah of usable power.

To fit the batteries into the front “electrical” compartment in our trailer, we fabricated a battery box out of angle iron and installed tie-down straps to keep them in place.

Battery Monitor
Renogy 500A Battery Monitor with Shunt
The Renogy Battery Monitor and its bright green LCD display in our electrical compartment

To manage our electrical system and to closely monitor our battery capacity while on adventures, it was important for us to install a good battery monitor. We choose Renogy’s 500A Battery Charger with Shunt. It’s inexpensive, monitors power going both in and out of your batteries, and keeps track of your net usage compared to your battery capacity.

To monitor your system’s power usage, the Renogy battery monitor uses a shunt which wires as the first component on the negative side of your battery. To ensure you measure ALL power usage, all charging and discharging devices must be wired behind this shunt.

The shunt then connects to the monitor display via a thin communication cable, which we installed later in the build.

Read our full review of the Renogy 500A Battery Monitor

Battery Disconnect Switch

To have control to shut down our electrical system to work on it or when the trailer is stored for long periods of time, we installed a battery disconnect switch in our system.

Like the battery monitor shunt, the disconnect switch must be wired early in the circuit with all other devices wired behind to ensure all devices can be disconnected from the battery. As you can see on our wiring diagram below, we wired our disconnect switch on the positive side of the battery.

250A System Fuse

Between the battery and the disconnect switch, we added a 250A system fuse on the positive battery terminal. In an event of a short circuit or component malfunction, this fuse will blow protecting the rest of our system. We sized this quite large to allow normal operation to occur without incident.

Bus Bars
travel trailer bus bar electrical wiring
The Wiring & Installation of the Core Electrical Components

Bus Bars, or power distribution blocks, aren’t always necessary but are a convenient way to keep your electrical system installation clean and organized. Bus bars provide multiple mounting posts for components to be wired together and make the installation of larger wires much simpler.

The biggest reason we choose to use both positive and negative bus bars in our build was to create single sources of contact to our disconnect switch on the positive side and our shunt on the negative side. The bus bars allowed to easily wire all other components behind the disconnect and shunt with a single wire between them and the busbar.

Shore Power Charging Components

120V Battery Charging

The term “shore power” comes from the marine industry, referring to a boat or ship being able to plug into the power grid when in port. For camping trailers or RVs, shore power is a 120V power source used for system charging when a connection to the power grid is possible.

For our shore power system, we chose NOCO’s Genius 10 – a simple 10A 120V car battery charger. We installed the NOCO charger into our electrical compartment and wired both positive and negative wires to their respective bus bars.

NOCO 15A AC Waterproof Inlet
With the NOCO plug, we can plug in using a household extension cord in seconds.
Plugging In

Because we installed the shore charger inside our electrical compartment, we needed a way to easily plug in a 120V power cord to charge the system. We installed NOCO’s waterproof 120V plug into the exterior of our electrical compartment and plugged the interior side into the charger. With this setup, we can plug in using a household extension cord in seconds.

With various and automatic charging phases, we can leave the NOCO battery charger plugged in for long periods of time without concern of overcharging or damaging our batteries

System Display/Control Components

12V Switch Panel

To add 12V circuits to separate and protect our various electrical components, we installed a Nilight 5-switch panel with 2 USB charging ports and a 12V “cigarette lighter” port. Protected with a 15A fuse, this panel also includes a voltmeter to verify our system voltage with the Renogy battery monitor.

To wire the panel into the system, we wired its source wires to the busbars, cut a hole into our control panel box and attached the panel via the corner screws.

We currently only use 3 of the switches, leaving 2 additional switches to expand our electrical components in the future. We have switches for our trailer’s led lighting, 12V water pump, and 12V refrigerator. Each of these components can be switched on and off as we need them. Being able to turn individual systems helps to reduce parasitic power waste in each of these systems when they are not in use.

The USB ports also come in handy for charging phones and other small devices while we are at the campsite. We use the 12V “cigarette lighter” port for our air compressor when needed.

Battery Monitor Display

We have the display for our Renogy Battery Monitor installed next to our switch panel and inverter switch in the middle of our electronics compartment. The battery monitor has a large display with adjustable backlighting, allowing easy viewing without having to turn on the lights.

We love that the battery monitor display shows us the net power usage in real-time. It also displays our current battery capacity in both percentage and icon. With the data, we can monitor our power usage closely ensuring we have enough power for the duration of our trip.

Inverter On/Off Switch

Our 1000w inverter has a separate switch installed in our control panel. While this switch we can quickly switch the inverter on when we need it and off when we don’t. Being able to turn the inverter off when we don’t need it avoids a small amount of parasitic power draw that it pulls when switched on. The switch also includes a power led as well as an error led to indicate problems with our inverter.

Overland Trailer Electrical System Control Panel
The Outward Overland Trailer Electrical System Control Panel

120V AC Components

1000W Pure Sine Wave Inverter

When designing our overland trailer electrical system, we chose to add a power inverter to the system. Inverters convert 12V DC power from the batteries to 120V AC power to use with most household devices. Pure sine wave inverters create clean and safe power that can be used for sensitive electronics like computers.

For our trailer, we purchased Renogy’s 1000W Pure Sine Wave Inverter. 1000W gives us enough wattage to use most electronics, but not quite enough to run high-power electronics such as hair dryers, electric kettles, or most heaters. These types of devices use a lot of power and with our desired 20A/day budget, we decided that we didn’t even want the temptation on this trailer. Besides, we planned a propane system on our trailer for cooking and heating.

120V AC RV Outlet
An external AC outlet lets us plug into our inverter power quickly and easily
125A Inverter Fuse

To install our inverter, we wired the inverter’s DC inputs into both busbars and added a 125A fuse inline for added protection. We then ran the small communication cable to the on/off switch on the control panel.

Getting 120V power out

Our inverter has two 120V AC outlets built into its side. Since the inverter is mounted inside our electrical compartment, we installed a waterproof AC outlet to the exterior of our trailer and plugged it into one of the inverter outlets.

Once the inverter is switched on, we can simply plug our AC devices into this plug on the outside of our trailer to get power. The inverter’s second outlet allows us to plug in additional devices to utilize the inverter’s power as needed.

Solar System Components

Solar Panels
Solarland SLP080-12M Multicrystalline 80 Watt 12 Volt Solar Panel
Our 80w slim solar panel sits just above our electrical compartment on the front of our trailer

To recharge our batteries while we’re away from the grid, we looked for the best way to add around 200w of solar panels to our trailer. While the top of our trailer is large and flat, we avoided placing panels on the trailer “lid” due to extra weight and the shadows that our roof rack accessories would cast on the panels. The best placement for a rigid was on the top of our electrical compartment at the front of our trailer. But being only 13 inches deep, typically sized 100w rigid solar panels wouldn’t fit. After a long search, we found an 80w slim rigid solar panel from NAZ Solar Electric.

We installed the 80w slim solar panel using an adjustable mounting system which allows us to adjust the angle of the panel to catch the most amount of sunlight. The cables pass through the roof of our electric compartment using a solar gland to keep water out.

As we didn’t have room to permanently mount all of our solar panels on the roof of our trailer, we purchased a 100w foldable solar suitcase from Renogy to add to our system. This portable solar panel gives us the flexibility of adding more power when we need it and allows us to move and point the 100w panel throughout the day to produce more power.

Now with 180w of solar panels, we purchased a solar parallel adapter cable giving us the ability to connect both panels in parallel with one output to the charge controller. We wired the rigid 80W panel to one end of this cable and connected the other end to a waterproof SAE-style solar input socket mounted to the side of the trailer. The solar input plug adds an easy way to plug in the solar cables from our 100w portable panel when needed.

Solar Charge Controller
Renogy Rover 20A MPPT Charge Controller
Our Renogy Rover Charge Controller sits just above our battery bank

To control the battery charging ability of our solar generation, we chose Renogy’s Rover 20A MPPT Solar Charge Controller. The MPPT controller converts the higher voltage from the parallel wiring of our panels to the best voltage to charge our batteries.

The charge controller is wired to the battery via the positive and negative busbars and also provides multi-phase charging to protect our batteries. We’ve added Renogy’s optional BT-1 Bluetooth adapter which provides the ability to monitor the status of your solar system via a smartphone.

Our controller is mounted just above our batteries in our electrical compartment, which is convenient for the placement of the included battery temperature sensor.

Summary

While we’ll surely add and expand our trailer’s electrical system in the future, planning our system by starting with an energy audit ensured we started on the right track. Our electrical system allows us to spend 5 days in the wild and more if the sun is readily available. It powers our lighting, water system, refrigeration, and device charging while camping without trouble. And when we return, it can be recharged easily and quickly from the grid.

If you are interested in diving deeper into the specific components we used on our build or would like to use our build as inspiration for your own RV, van, or trailer electrical system build, please view our interactive wiring diagram below. You can also download the diagram in pdf format which also includes clickable links for each component.

Interactive Wiring Diagram

Hover/Click on The Components for More Info

Download a PDF of the Outward Trailer Wiring Diagram

Designing a DIY Off Grid Solar System

Renogy 100w flexible panels installed on boat bimini
Adding solar panels to an off-grid electrical system can help extend trips to the outdoors.

These days, a growing number of people are choosing to explore the outdoors in comfort.  Having the luxuries of lighting, refrigeration, and running water can help extend trips in the wild and make them more enjoyable for all.  Whether your outdoor vehicle of choice is an RV, van, boat, travel trailer, or overland trailer like ours, you deserve an electrical system that has enough juice to last as long as you want.  If you are thinking about designing a new off-grid solar system or want to redesign your current vehicle’s system, we can help point you in the right direction.

While every off-grid solar system is different, every system includes the basic components below.  We really love Renogy’s line of electronics and think they match up well with most people building their own DIY off-grid solar system.  We aren’t being paid anything by Renogy to promote their products, we just feel that they offer solid electronics at the best prices and thus have used them almost exclusively in our latest solar system builds.

If you choose to purchase any of the products we’ve highlighted, don’t forget to use coupon code Welcome5 to receive 5% off when purchasing through Renogy.com.

Batteries

Batteries are the heart of an off-grid solar system.  They store the power your solar panels generate for use when the sun isn’t shining. Being the workhorse of your system, they will typically be the most expensive part of your system. Batteries for an off-grid system should be sized according to your daily power need.

Deep Cycle vs Starting Batteries

Standard automotive batteries are built to deliver high-cranking amperage for short periods of time to start your car. Once started, your car’s electrical system depends on your alternator to generate the vehicle’s power needs and to recharge the battery.  Off-grid systems have different needs and thus require different batteries.  Deep cycle batteries are designed to be deeply discharged and recharged regularly and, as a result, are the battery of choice for off-grid solar systems. Deep-cycle batteries will last longer in an off-grid power system and deliver better performance than vehicle-starting batteries.  Motorhomes, vans, and boats typically have both types of batteries on board, while camping or travel trailers typically have only deep-cycle batteries.

Types of Deep Cycle batteries

There are a few main types of deep-cycle batteries available on the market, including flooded lead acid, AGM, and lithium batteries. Flooded lead acid (FLA) batteries are the least expensive but require regular maintenance and shouldn’t be discharged to less than 50% of their capacity. AGM batteries are spill-proof, don’t require maintenance, and can be discharged to 80% of their capacity, but are more expensive than FLA batteries. Lithium batteries have longer lifespans, are also maintenance-free, and can be discharged to 100% without much damage. They are the most expensive battery type, but costs are coming down.

Battery Capacity

Deep cycle batteries have capacity ratings measured in amp hours (Ah).  A 100Ah deep cycle battery can store and deliver 1 amp of power for 100 hours or 1o amps of power for 10 hours. When designing an off-grid solar system, we recommend using Ah to calculate your power usage and your corresponding solar needs.


Renogy Deep Cycle AGM Battery 12 Volt 100Ah, 3% Self-Discharge Rate, 2000A Max Discharge Current, Safe Charge, Appliances for RV, Camping, Cabin, Marine and Off-Grid System, Maintenance-Free, Gray
Renogy 12V 100Ah Lithium LiFePO4 Deep Cycle Battery,4000+Deep Cycles,Built-in BMS,FCC&UL Certificates,Backup Power Perfect for RV,Marine,Off-Grid System,Maintenance-Free
Our Favorite
Renogy 12V 200Ah Lithium LiFePO4 Deep Cycle Battery with Bluetooth,2000+Deep Cycles,Backup Power Perfect for RV,Off-Road,Cabin,Marine,Off-Grid Home Energy Storage
Renogy Deep Cycle AGM Battery 12 Volt 100Ah
Renogy 12V 100Ah Lithium LiFePO4 Deep Cycle Batter
Renogy 12V 200Ah Lithium LiFePO4 Deep Cycle Battery with Bluetooth
Renogy Deep Cycle AGM Battery 12 Volt 100Ah, 3% Self-Discharge Rate, 2000A Max Discharge Current, Safe Charge, Appliances for RV, Camping, Cabin, Marine and Off-Grid System, Maintenance-Free, Gray
Renogy Deep Cycle AGM Battery 12 Volt 100Ah
Renogy 12V 100Ah Lithium LiFePO4 Deep Cycle Battery,4000+Deep Cycles,Built-in BMS,FCC&UL Certificates,Backup Power Perfect for RV,Marine,Off-Grid System,Maintenance-Free
Renogy 12V 100Ah Lithium LiFePO4 Deep Cycle Batter
Our Favorite
Renogy 12V 200Ah Lithium LiFePO4 Deep Cycle Battery with Bluetooth,2000+Deep Cycles,Backup Power Perfect for RV,Off-Road,Cabin,Marine,Off-Grid Home Energy Storage
Renogy 12V 200Ah Lithium LiFePO4 Deep Cycle Battery with Bluetooth


Solar Panels

Solar Panels convert energy from the sun into usable (and storable) power for your system. Solar energy is freely available and is environmentally friendly, making it the power of choice when venturing away from the grid.  When connected to deep-cycle batteries, solar panels recharge the batteries during daylight hours. During the evening when the sun isn’t shining, power is discharged from the power stored in your batteries.  When the sunlight returns, the batteries are recharged again.

The two main types of solar panels are rigid and flexible solar panels.  Rigid solar panels are more efficient, cheaper, and have longer lifespans than flexible panels.  Flexible panels are lighter and can be installed on surfaces that aren’t perfectly flat – like the roof of an Airstream travel trailer or a boat bimini cover. Rigid solar panels offer the best value for standard installations, while flexible panels offer the “flexibility” to add solar in cases where heavy, rigid panels aren’t an option.


Renogy Solar Panel 100 Watt 12 Volt, High-Efficiency Monocrystalline PV Module Power Charger for RV Marine Rooftop Farm Battery and Other Off-Grid Applications, RNG-100D-SS, Single 100W
Our Favorite
Renogy Solar Panel 100W 12V Lightweight Semi Flexible Black Division Monocrystalline Bendable Mono Off-Grid Charger for RV Boat Van Car Uneven Surfaces, LTWT-Flex
Renogy Solar Panel 200W 12V Lightweight Monocrystalline Semi-Flexible Bendable Mono Off-Grid Charger for Marine RV Cabin Van Car Uneven Surfaces
100 Watt 12 Volt Monocrystalline Solar Panel (Compact Design)
100 Watt 12 Volt Black Division Lightweight Monocrystalline Solar Panel
200 Watt 12 Volt Flexible Monocrystalline Solar Panel
Renogy Solar Panel 100 Watt 12 Volt, High-Efficiency Monocrystalline PV Module Power Charger for RV Marine Rooftop Farm Battery and Other Off-Grid Applications, RNG-100D-SS, Single 100W
100 Watt 12 Volt Monocrystalline Solar Panel (Compact Design)
Our Favorite
Renogy Solar Panel 100W 12V Lightweight Semi Flexible Black Division Monocrystalline Bendable Mono Off-Grid Charger for RV Boat Van Car Uneven Surfaces, LTWT-Flex
100 Watt 12 Volt Black Division Lightweight Monocrystalline Solar Panel
Renogy Solar Panel 200W 12V Lightweight Monocrystalline Semi-Flexible Bendable Mono Off-Grid Charger for Marine RV Cabin Van Car Uneven Surfaces
200 Watt 12 Volt Flexible Monocrystalline Solar Panel


Solar Charge Controller

Solar Charge Controllers accept the power from your solar panels and convert it to the appropriate voltage and current (amperage) to best charge your batteries.  They prevent your solar panels from overcharging your batteries – which can drastically reduce their lifespan.

There are two main types of solar charge converters – Pulse Width Modulation (PWM) and Maximum Power Point Tracking (MPPT). PWM charge controllers are less expensive but less efficient than MPPT controllers.  MPPT controllers are more costly but convert much more of the current available from a solar panel to the appropriate voltage for battery charging. MPPT controllers are up to 30% more efficient than PWM controllers – leading to faster battery charging times.


Renogy Voyager 20A 12V/24V PWM Waterproof Solar Charge Controller w/ LCD Display for AGM, Gel, Flooded and Lithium Battery, Used in RVs, Trailers, Boats, Yachts, Voyager 20A
Renogy 30A 12V/24V PWM Solar Charge Controller with LCD Display Flush Mount Design Negative Ground, Compatible with Sealed, Gel, Flooded and Lithium Batteries, Adventurer 30A
Our Favorite
Renogy Rover 40 Amp 12V/24V DC Input MPPT Solar Charge Controller Auto Parameter Adjustable LCD Display Solar Panel Regulator fit for Gel Sealed Flooded and Lithium Battery
Renogy Voyager 20A 12V/24V PWM Waterproof Solar Charge Controller
Renogy 30A 12V/24V PWM Solar Charge Controller
Renogy Rover 40 Amp 12V/24V DC Input MPPT Solar Charge Controller
Renogy Voyager 20A 12V/24V PWM Waterproof Solar Charge Controller w/ LCD Display for AGM, Gel, Flooded and Lithium Battery, Used in RVs, Trailers, Boats, Yachts, Voyager 20A
Renogy Voyager 20A 12V/24V PWM Waterproof Solar Charge Controller
Renogy 30A 12V/24V PWM Solar Charge Controller with LCD Display Flush Mount Design Negative Ground, Compatible with Sealed, Gel, Flooded and Lithium Batteries, Adventurer 30A
Renogy 30A 12V/24V PWM Solar Charge Controller
Our Favorite
Renogy Rover 40 Amp 12V/24V DC Input MPPT Solar Charge Controller Auto Parameter Adjustable LCD Display Solar Panel Regulator fit for Gel Sealed Flooded and Lithium Battery
Renogy Rover 40 Amp 12V/24V DC Input MPPT Solar Charge Controller


Inverter

Since batteries are typically 12V, most RVs, vans, boats, and travel trailers typically utilize 12V electronics in their design.  With 12V current readily available via the batteries, 12V lighting, water pumps, and appliances are the most efficient.  If you want to bring along some of the comforts of home, the 12V current from your batteries needs to be converted to 120V.  Power inverters are the devices that accomplish this task.

As an example, if you want to install a TV in your RV or charge a laptop for working remotely from your overland trailer, you’ll need an inverter.  When deciding whether you need an inverter, just think of any devices you want to bring along with you that have a typical household plug.

Power inverters are rated by the number of watts they can produce.  When choosing an inverter, you’ll want to determine the maximum amount of 120V watts that you’ll use at one time and size it above that.  For example, if you will only use the inverter to watch TV that uses 70 watts, you’ll want an inverter that produces at least 100 watts of power.  If you bring your 1500-watt electric kettle along with you, you’ll want to make sure you have a 1500w inverter.  As with most elements of an off-grid electrical system, you’ll want to choose an inverter that’s rated for a bit more power than you’ll use to give you some extra headroom.

Inverters aren’t 100% efficient which means that some of the 12V power they convert to 120V gets lost in the process.  And since inverters typically are used for higher-wattage electronics, using your inverter can discharge your battery quickly.  Make sure to consider this when choosing an inverter.


Renogy 700W Pure Sine Wave Inverter 12V DC to 120V AC Converter for Home, RV, Truck, Off-Grid Solar Power Inverter 12V to 110V with Built-in 5V/2.1A USB Port, AC Hardwire Port, Remote Controller
Our Favorite
Renogy 1000W Pure Sine Wave Inverter 12V DC to 120V AC Converter for Home, RV, Truck, Off-Grid Solar Power Inverter 12V to 110V with Built-in 5V/2.1A USB Port, AC Hardwire Port, Remote Controller
Renogy 2000W Pure Sine Wave Inverter 12V DC to 120V AC Converter for Home, RV, Truck, Off-Grid Solar Power Inverter 12V to 110V with Built-in 5V/2.1A USB Port, AC Hardwire Port, Remote Controller
Renogy 700W Pure Sine Wave Inverter
Renogy 1000W Pure Sine Wave Inverter
Renogy 2000W Pure Sine Wave Inverter
Renogy 700W Pure Sine Wave Inverter 12V DC to 120V AC Converter for Home, RV, Truck, Off-Grid Solar Power Inverter 12V to 110V with Built-in 5V/2.1A USB Port, AC Hardwire Port, Remote Controller
Renogy 700W Pure Sine Wave Inverter
Our Favorite
Renogy 1000W Pure Sine Wave Inverter 12V DC to 120V AC Converter for Home, RV, Truck, Off-Grid Solar Power Inverter 12V to 110V with Built-in 5V/2.1A USB Port, AC Hardwire Port, Remote Controller
Renogy 1000W Pure Sine Wave Inverter
Renogy 2000W Pure Sine Wave Inverter 12V DC to 120V AC Converter for Home, RV, Truck, Off-Grid Solar Power Inverter 12V to 110V with Built-in 5V/2.1A USB Port, AC Hardwire Port, Remote Controller
Renogy 2000W Pure Sine Wave Inverter


On to the Next Step

Now that we’ve laid out the various components you need to design a DIY off-grid solar system, the next step is to determine how much power your solar system will need to generate and store. To come up with some numbers, you’ll want to do an energy audit of your RV, van, boat, trailer, or other off-grid application.  If you are redesigning an existing system, an energy audit is as simple as determining how much power you use per day.  If you are building a new solar system, you’ll need to project your power usage based on your plans.  Either way, in part 2 of our Off Grid Solar System series, we’ll show you how to conduct an energy audit on your system.

Renogy Battery Monitor Review

Renogy 500A Battery Monitor with ShuntOff-grid power systems can be complex. Off-grid power systems typically have multiple inputs to charge your batteries – including solar, 120V AC, or DC. Your power system also has various outputs – such as inverters, lighting, refrigeration, and more.  Away from home, you rely on your power system to keep you comfortable and safe.  But it’s often difficult to tell what’s really going on in our systems.  The Renogy 500A Battery Monitor is built to solve this problem.

The Renogy Battery Monitor is a small rectangular display that when installed with its included battery shunt, gives you precise readings on your battery usage and current capacity. Rated at 500 Amps, it’s a useful addition to battery-based power systems of all sizes.

Our Verdict:

We’ve really grown to love Renogy’s products.  They are well-designed, reliable, and affordable. The Renogy 500A Battery Monitor is no exception. This little screen lets you know exactly what’s going on in your power system for under $100. Add Renogy’s BT-1 Bluetooth adapter and you can view your power system’s status in real-time on your phone.

Specifications:

  • Accurate within 1%
  • High and Low capacity alarm functions
  • Compatible with Lead Acid, AGM, Gel, LiFePO4, Lithium-ion, and Nickel-metal hybrid batteries
  • Works with systems from 10V to 120V
  • Customizable battery size and voltage shut-off
  • Backlit display
  • Weight: 2.6 oz
  • Monitor Size: 3.9in x 2.4in x 0.7in

How it Works:

The Renogy better monitor comes with a shunt – a low-ohm resistor used to measure current.  You install this shunt between the negative terminal of your battery and the negative side of your power system.  Once the shunt is installed, a small wire is connected between the shunt and the battery monitor. As your power system’s current flows (both in and out) through this shunt, the display on the battery monitor shows you how much power is being consumed (going out of the batteries) vs how much power is being put back in your batteries through charging sources.  At a quick glance, the Renogy battery monitor displays your net power consumption.  For example, if you are generating 40 watts of power from a solar panel, but have 60 watts of lights on at the same time, you are using 20w of your battery’s capacity.

The battery monitor “monitors” your net power flow at all times and calculates your net power flow against your battery size.  Using this internal calculation, the battery monitor also displays your current battery percentage. Basically, the Renogy Battery Monitor shows you your net power flow at any given moment AND keeps track to let you know the current level of your battery.

Why It’s Awesome

Knowing how much power you’re really using is important to ensure your batteries last.  For example, if you have a 100 Amp Hour battery and use 50Ah of power per day, your system isn’t going to last through a 5-day RV trip.  Knowing how much each electric device in your van, RV, or boat allows you to be informed in your decisions of what devices to use and for how long.

As an example, we recently installed a Renogy Battery Monitor in a 46ft sailboat.  We were experiencing battery problems but struggled to diagnose the cause.  With the Renogy Battery Monitor, we discovered that the LED strip lighting in the boat that we thought was energy efficient actually uses 5x more power than the simple overhead lights we’d been avoiding.

Battery Monitors like the Renogy Battery Monitor have been around for a long time, but they have traditionally been in the $200 – $300 range.  At under $100, Renogy’s monitor lowers the barrier of entry to closely monitor smaller power systems and large systems alike.

Add the optional BT-1 Bluetooth adapter and you can see your real-time power usage right on your phone using Renogy’s DC Home app.  Curious to know how much solar you’re currently generating? It’s just a short tap away.

How We Use The Renogy Battery Monitor

Renogy 500A Battery Monitor with Shunt Review
Our Renogy Battery Monitor on the Outward Overland Trailer helps us know exactly how much battery capacity we have left during our trips.

We have one in our Outward Overland Trailer to monitor our 200Ah battery bank with 180 watts of solar panels.  In the trailer, we use the battery monitor to test the true power usage of any new devices we plug in, charge, or use as a part of our overland setup.  Measuring power usage is as simple as turning everything else off to get a zero power reading on the battery monitor.  We then plug in and turn on the device and the monitor lets us know how many watts it uses.

Our trailer batteries are of the traditional flooded lead-acid variety. To maintain their health they are not supposed to be discharged more than 50% of their total capacity.  The Renogy Battery Monitor lets us know when we’re reaching our batteries’ 50% discharge limit even when it is still powering devices. With the Renogy battery Monitor, we fell fully in control of our battery system while camping off-grid.

We also have a Renogy Battery Monitor in our 46ft Sailboat.  Our batteries were constantly setting off low-voltage alarms. We had no idea if the batteries were going bad or if we simply were using more power than our system was designed for. The truth is that until we were able to take the boat through a full power audit using the Renogy Battery Monitor, we had no idea how much power each light or accessory used.  We now know exactly how much each device uses and can plan our power usage accordingly.  Knowing our typical power usage also helped us choose the number of solar panels we needed.

Overland trailer Electrical System
The Renogy 500A Battery Monitor installed in our overland trailer

Our Favorite Features:

  • The low cost. At $62 at the time of writing this should be a no-brainer addition to any van, boat, or RV that needs better battery management
  • The clear battery percentage. A lot of battery monitors show you the current voltage of the system. These types of monitors require you to guess or do complicated math to determine what level your batteries are currently at.  For the Renogy Battery Monitor, the current battery capacity is primary. It lets you know exactly where you stand including battery percentage, remaining Amp Hours, a visual battery icon, and the time remaining until a full charge or discharge.
  • It’s simple and easy to install. The installation of the shunt requires you to do a bit of homework to make sure the monitor is accurate.  Make sure that all of your batteries’ charging and discharging flow through the shunt. We recommend picking up a negative bus bar to make sure all of your negative wires are wired behind the shunt if you have a multiple battery bank.  With the bus bar, connecting the shunt between the battery and the bus bar ensures all charging and discharging of your system is ready by the battery monitor.


Review: OVS Nomadic Car Side Shower Room

Overland Vehicle Systems Nomadic Car Side Shower Room
The Nomadic Side Shower Room provides important privacy when showering, changing, or using the bathroom outdoors.

Being able to take a shower and use the toilet comfortably while camping shouldn’t be considered a luxury. Getting clean while in the wild can help extend trips.  Having a toilet with privacy allows everyone at camp to take care of business without the anxiety. The Overland Vehicle Systems‘ Nomadic Car Side Shower Room is a roof-mounted, fold-out shower room that adds the comfort of privacy to your camping setup.

The Verdict:

The OVS Nomadic Shower Room stores away conveniently on your roof rack much like a traditional awning, such as the OVS Nomadic Awning. When unfolded, it’s smart, spacious, and thoughtful.  It’s smart due to its adjustable straps to accommodate various vehicle heights and weighted bottoms to help keep its shape.  With 3.5ft by 3.5 ft of interior space, it’s spacious enough to not crowd your shower or toilet activity. Its double interior pouches, velcro showerhead strap, and double-sided entry zipper will have you wondering how the designers thought of it all.  The build and materials of the OVS shower room are outstanding, it’s effortless to set up and take down, and the price makes it a no-brainer addition to any overlanding configuration.

Sale
Nomadic Car Side Shower Room
94 Reviews

Design:

The design of the OVS Shower Room is very similar to the OVS 270 Awning, featuring a thick, black, zippered cover for protection when stowed. The four walls of the shower room are made of 420D Oxford Rip Stop fabric and are grey in color.  The support arms are made of aluminum, create a strong foundation for the shower room to hang from, and are easily extended and locked in place for use. The zippers feel solid and a double-sided entry zipper on the back of the shower room makes it easy to get in and out. The pouches and the velcro showerhead strap are nice touches.

Privacy:

OVS NOMADIC CAR SIDE SHOWER ROOM
The OVS Nomadic Shower Room fits perfectly on our overland trailer’s roof rack.

The OVS Shower Room helps to keep your shower or toilet time discreet.  The walls are fully opaque to ensure that the angle of the sun doesn’t create embarrassing silhouettes. The shower room adjusts to a maximum of 76″.  If mounted on the roof of a lifted vehicle, you may need every inch, but if your vehicle isn’t as high, the adjustable straps can be shortened.

Each wall of the OVS shower room contains a weighted structural rod in its bottom horizontal.  This added weight prevents the square room from easily collapsing.  In our testing, the shower room held its shape well in moderate wind.  If the winds pick up, the corners can be staked down to stay in place.  Four stakes along with a carrying bag are included with the OVS Shower Room.

Durability:

Because the OVS Shower Room will only be deployed while out at the campsite, the 1000G PVC Travel Cover will take the majority of the abuse.  The cover and its zipper seem up to the task.  They look good on your vehicle and look to be strong.

The shower room walls are thick (primarily to prevent the aforementioned silhouetting) and should last longer than you’ll have your vehicle.  The aluminum folding arms are more than up to the task of holding up the shower room, while also remaining lightweight.  My only concern about the build of this unit would be the nylon straps.  Straps like these have a history of breaking down when exposing the sun for too long.  Even if this is the case, the straps should only see the sun in limited doses when in service.  The vast majority of the time, the travel cover will be blocking sunlight to all other components.

Setup & Pack Away:

OVS NOMADIC CAR SIDE SHOWER ROOM
The zippered front section, double interior pouches, and the velcro showerhead strap are thoughtful touches.

The OVS Shower Room is a breeze to set up – taking only seconds.  Unzip the travel cover to expose the folding arms and fabric walls.  As unzipped, the walls easily “unroll” to the ground.  Fold the aluminum arms outward to lock them into place.  The only hiccup we had in our experiences with setting this up is that the bottom of the walls can be a little awkward to get into a square shape.  The bottom weighted rods don’t always allow for the walls to unfold naturally and they need a bit of manual coaxing.  That’s it. With the shower room set up, the room is ready to be used for showering, using the toilet, changing, or whatever other private activity you choose.

Packing the OVS Shower Room away is equally easy.  Unlock the aluminum arms and folded them back into place. Next, fold the four bottoms of the walls flat into each other. Folding the bottom of the walls is important as this serves as the beginning of your roll of the walls back into the case.  Finally, roll up and secure the walls zipping the travel cover around them.

The OVS Nomadic Car Side Shower Room (that’s a mouthful) is easy to deploy and easy to store.  It’s a product with a simple purpose and it has a simple design as a result.

Best Features:

  • We love the weighted bottoms of the walls which help keep the shower room structurally.
  • The front (carside) of the shower room has a zippered section that can lower the front wall to gain easy access to items stored on your vehicle.)
  • The 2 interior pouches are great for storing toiletries or toilet paper.
  • We are really fond of the look.  The black, grey, and aluminum color scheme looks great on our trailer.
Sale
Nomadic Car Side Shower Room
94 Reviews

Have an OVS Nomadic Car Side Shower Tent?  Do you love it?  We’d love to hear your opinions in the comments.

Review: OVS Nomadic 270 LT Awning

OVS Nomadic 270 LT Awning

This past summer, we purchased and installed the OVS Nomadic 270 LT Awning on our overland trailer. What follows is our OVS Nomadic 270 Awning review, detailing our thoughts, opinions, and experiences with the awning.

As we were building our overland trailer, it quickly became clear that we’d need some protection from the elements.  Our kitchen pulls out from the side of the trailer and in times when we deal with rain or snow while out in the wild, it’s important that we can continue to prepare food, cook, and do dishes. Based in Arizona, it was also important to us to ensure we had some space to escape the sun on hot desert days.

We needed an awning that could be attached to our roof rack and extended when we needed protection from the elements. The Overland Vehicle Systems Nomadic 270 LT Awning fits the bill perfectly for our needs.

The Verdict:

We LOVE the OVS Nomadic 270 LT Awning. It wraps around 2 sides of our trailer providing 80 square feet of coverage for our side kitchen and rear storage areas. It’s extremely well-built and made of strong materials that look like they will hold up over time. It’s aluminum construction makes it lightweight and the included extendable support poles provide extra points of stability in severe weather. Rooftop awnings can be expensive, but the OVS Nomadic awning is affordably priced.  We highly recommend it for anyone looking to add some shade or weather protection to their overland vehicle or trailer.

Design:

OVS Nomadic 270 LT Awning Review
Our OVS Nomadic 270 LT Awning installed and opened up on our overland trailer.

“Batwing” awnings are brilliant – multiple supports, each with a triangle of fabric attached, unfurl creating a surprising amount of overhead coverage.  The Nomadic 270 LT awning is built with boxed aluminum rafters giving it strength while also looking really clean.  The five rafters feel solid and each rafter is connected to the canopy fabric with heavyweight hook and loop wraps. The aluminum design choice gives the awning robust strength while keeping its overall weight down.

The Nomadic 270 LT is strong enough to not need the included telescoping support poles under normal weather conditions.  If the weather picks up beyond a slight breeze, the support poles can be easily deployed to provide extra piece of mind and support to the rafters. In serious weather conditions, the awning can be further secured by utilizing its multiple tie-down attachment points, 8 included shock cord tie-downs, and ground stakes. In our testing, we didn’t need the tie-downs.  We really didn’t need the support poles most of the time, but when the rain rolled in, the poles were handy to ensure the weight of the rain didn’t cause extra stress on the aluminum rafters.

The two main support poles come attached to the bottom of two of the main rafters. They have a swivel at the top to allow the pole to pivot and are adjustable in length. They are easily stored overhead via hook and look wraps, but can quickly be unfolded in seconds when the weather surprises you.  Two additional support poles are also included with the Nomadic awning in a convenient carry bag that can be stored away for when the weather gets really hairy.  With various support options, we’re confident that this awning can stand up to all different types of weather.  OVS markets this awning as “four-season ready” and we don’t doubt this claim.  It’s a well-engineered and well-built awning.

The Nomadic 270 LT comes with 2 heavy-duty mounting brackets and all the necessary hardware to attach to various types of roof racks. You shouldn’t need to pick up any additional hardware to install this awning.

Weather Resistance:

OVS Nomadic 270 LT Awning Up Close
The Nomadic 270 LT’s aluminum rafters attach to the canopy fabric with multiple heavy-duty hook and loop straps.

The outer protective case/bag has held up well without any fading or damage even when stored outside through the brutal Arizona summer.  In the multiple rain storms we’ve used the awning in, it has kept us dry.  With 80 sq ft of coverage, we were able to prepare and cook full meals under the awning without having to adjust any of our routines.  It really does provide a surprising amount of space to be protected from the sun, rain, or snow.  We didn’t experience any leaks in the Nomadic 270 LT’s 600D Poly Cotton Rip-Stop Cover or at any of the seams.

Without any support poles or tie-downs, the awning stood on its own quite well with little to no sag.  As storms rolled in, we set up the two attached support poles to give the awning extra strength.  With just the two support poles, the awning easily handled the heavy rain and increased wind.  In 95% of cases, we really don’t think the additional support poles or tie-downs are necessary, but the extra support is awesome to have on hand when and if needed.

Overall, this awning does what it’s meant to do – keep you out of the elements.  It does it well in our opinion. What it doesn’t do is protect you from the sides. To protect you from sideways rain, OVS offers walls that can be attached via zipper to the top of the awning.  If it makes sense for you, these walls can turn your awning into a fully surrounded tent.

Durability:

The Nomadic 270 LT is built with quality materials.  The 600D rip-stop fabric combined with the all-aluminum construction leads us to believe that these awnings will last a long, long time.  The design of the various elements work really well and we couldn’t find one element we would improve on.  The outer cover is holding up well and keeps the awning well protected during storage. The mountain brackets have stayed rock solid in our use and our awning still looks brand new.

Setup & Pack Away:

Set up and take down is a breeze and can be done in a few short minutes.  After unzipping the protective bag, you’ll find the rafters secured in place with 2 straps.  Once these straps are released, the rafters can be easily unfolded like a “batwing” to realize its full size. The awning is held open by an included adjustable strap that attaches to the first rafter and to a forward point on your vehicle. To keep the awning fully open and taught, you’ll want to try a few attachment points to see what works best for you.

To pack it away, you’ll take off the holding strap, fold the rafters back into the protective case, and roll up the triangles of the canopy that hang down.  Once rolled, this fabric is secured along with the rafters with the 2 straps.  Zip the case back up and you’re ready to go.

Best Features:

  • This awning looks awesome. The black case is simple and understated when stored. We love the grey and aluminum design of the awning when deployed.
  • The size. The coverage of this awning (80 sq ft) is remarkable considering it’s just 83″ long when stored on your roof.
  • The aluminum rafters. These feel beefy, clean-looking, and lightweight. What more could you ask for?
  • The support options. We love that the awning has built-in support that can be deployed in seconds. Extra support can be added as needed.
  • The price.  We appreciate that OVS produces great outdoor products at more affordable prices. We hope they keep it up.

Looking for a roof rack-mounted shower/toilet solution for your overlanding rig? Check out our review of the OVS Nomadic Car Side Shower Room.

Have an OVS Nomadic Awning?  What do you think about yours?  Let us know in the comments.

Garmin inReach Mini 2

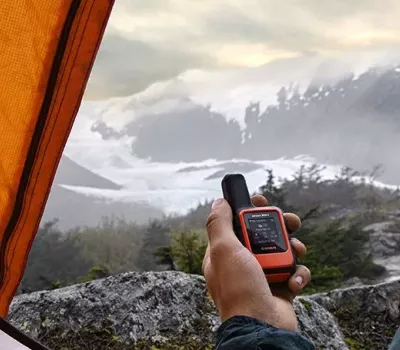
Satellite Communicators: How to Stay in Touch While Off the Grid

The Zoleo Satellite Communicator

Everybody’s definition of what is the wild is different.  For some, the wild might be a hike in the hills on the outskirts of town.  For others, the wild is backpacking deep in the mountains far from civilization.

My definition of the wild is somewhere in between. I love exploring spaces off the beaten path, usually right on the edge of cell phone coverage.  On most trips I take into outdoor spaces, I can’t be sure whether I will have a cell signal where I am going or not.  Sure, cellular carriers all have coverage maps, but I find these unuseful for accurately determining whether or not I will be able to make a call in an emergency.

For many, one of the main thrills of exploring the wild is the potential for improvising and displaying self-sufficiency in emergency situations outdoors.  For sure, all explorers of wild spaces should have some basic understanding of how to make it out alive when something goes wrong, but I prefer always having a way to “call home” if things go sideways.

Safety in the outdoors demands an appreciation for redundancy.  Relying on only one way to start a fire or only one source of food can quickly become a mistake when off-grid.  You may be wired differently, but when I’m heading out to enjoy the outdoors, the last thing I am interested in is enacting my own personal survival show.  It’s important to me (and to those who depend on me) to come back safely at the end of my trip.  Exploring wild spaces is one of my favorite things to do, but it’s not worth my life.

The good news is that we no longer have to take unnecessary risks when spending time outside civilization’s bounds.  Cellular coverage in the United States is ever-expanding and you might just find that your favorite spot in the woods has just enough “bars” to get a call out. I’m consistently surprised by where I can manage to find a cell signal these days.

The challenge with relying on cell service is that you never know if you will have it or not when you’re off the beaten path.  You may be able to Facetime your family while camping for a night miles outside of the nearest town, but you may not be able to get a call out over the next hill while hiking the next day. I’ve sailed down the California Coast and been able to answer work emails or stream music without issue.  I’ve also sailed very similar routes and not had cell coverage for most of the day.  The bottom line is that you never know what coverage you will have when you’re exploring remote spaces.  If you’re like me, I want a backup plan when I’m off the grid.

The answer is a satellite communicator – a communications device that utilizes a network of satellites to keep you connected to the outside world, even without cell coverage.  With one of these babies, you’ll never need to worry about being outside of cell range again.  If something goes wrong while you’re off the grid, a satellite communicator will allow you to send a text to family and friends or call emergency services no matter where you find yourself.

Types of Satellite Communicators

Distinct from satellite phones, satellite communicators are primarily designed to communicate via short bursts of data – text messages, location updates, and even weather reports. While there are a number of models of satellite communicators on the market, there are two main types of satellite communicators.

Satellite Communicators that are designed to be used with your cell phone

These devices don’t have an onboard keyboard and thus can’t be used directly to get a message out.  They are meant to be paired with a mobile device with a companion app that handles messaging. These devices are typically cheaper and smaller but do require extra steps to get a message out when far from home.

Devices of this type: Zoleo, Garmin inReach Messenger, ACR Bivy Stick

Satellite Communicators that can be used without a cell phone

These devices can be used on their own to message home but also can connect to a mobile device and companion app for easier messaging. They typically have more features that may include GPS mapping, an altimeter, a compass, and other useful tools.  Some devices of this type include a screen and keyboard (think the old Blackberry format) and others utilize a screen with a number of buttons that can be used to type out a message.

Devices of this type: Garmin inReach Mini 2, Spot X

Garmin inReach Mini 2

Currently Available Satellite Communicators:

Zoleo Satellite Communicator

The Zoleo Satellite Communicator is a wallet-sized black and green device that is marketed to extend your messaging capabilities around the globe without coverage gaps.  When paired with its free companion app, the Zoleo uses wifi or a cellular network to send and receive messages when available.  When not in wifi or cellular range, the Zoleo uses the Iridium satellite network to get your messages out. It has a protected SOS button on its front as well as an additional “Check-in” button that allows for sending predetermined check-in messages without using the phone/app. Once activated with a Zoleo plan, the Zoleo includes a dedicated SMS number and email address – a nice feature that makes for easier messaging for friends and family.

Buy Now on Amazon

Garmin inReach Messenger

The Garmin inReach Messenger is an all-black, square device that’s about half the size of a cell phone – though thicker. Much like the Zoleo, the inReach Messenger is meant to be paired with a companion app and it has minimal direct functions on the device. Unlike the Zoleo, the inReach Messenger includes a small, black-and-white, display on the front of the device to allow you to see what’s happening on your device without using your phone. The Messenger also takes advantage of your connected phone’s cellular or wifi connectivity (when available) to send messages without tapping into your satellite service plan allowance. With up to 28 days of battery life and a “safety charging” option – allowing you just enough juice to send a message – the inReach Messenger is a great option for those serious about the outdoors, as well as serious about safety.

Buy Now on Amazon


Garmin inReach Mini 2

The Garmin inReach Mini 2 is Garmin’s fuller-featured satellite communicator. The Mini 2 is a tiny device with a larger display than the Messenger allowing for some advanced routing and tracking features when hiking.  The larger display gives you the ability to scroll through received messages and easily send preset messages.  Fitting easily in your hand, the biggest selling feature of the Mini 2 is its small size.  Like most of these devices, pairing the Mini 2 with its companion app makes the device infinitely more usable. Overall the Mini 2 is a nicely designed device, but it doesn’t give you a whole lot more than the Messenger.

Buy Now on Amazon


ACR Bivy Stick

The ACR Bivy Stick is similar to the Zoleo in that it doesn’t have a display on the device itself. Its rectangular shape includes a large hole through the top of the device to use for hanging.  While most will hang their satellite communicator from a backpack, devices that have easy attachments to hang, like the Bivy Stick, allow you to store it in more places.  Speaking of storing it, the Bivy Stick relies heavily on its companion app to access and complete the typical satellite communicator features: global satellite messaging, weather reports, location sharing and tracking, and check-ins.  Like other similar devices, it does have dedicated check-in and SOS buttons. One plus with the Bivy Stick is that its available service plans do not have activation fees.

Buy Now on Amazon


Spot X

For the messaging addicts out there, the Spot X is a satellite Communicator that has a built-in keyboard. With a similar “Blackberry” designed front, half of the Spot X is a display and the other has a small keyboard. Beyond the keyboard, the Spot Z also has dedicated SOS and tracking buttons. With its own dedicated phone number, the Spot X truly is a stand-alone device.  With most of the industry moving to devices that heavily rely on companion apps, some may love the independence of the Spot X.  While it does have its own companion app, the Spot X is the device most capable of being used without the app.  With only one battery to worry about keeping charged and only a single device to worry about, the Spot X may be perfect for the minimalist outdoorsmen types.

Buy Now on Amazon


Satellite Communicator Coverage Plans

Satellite Communicators rely on a satellite network to send and receive messages outside of cell phone range. Each company has its own service plans for its satellite communicators.  When choosing a plan, first consider the number of messages you’ll need per month as well as the costs involved to suspend your service in months when you won’t make it off-grid.

Zoleo Plans:

Basic In Touch Unlimited
Monthly Fee $20 $35 $50
# of Satellite Messages 25 250 Unlimited
Additional Messages 50¢/ea 50¢/ea Free (unlimited)

Zoleo Plan Notes:

  • $20 activation fee for all plans
  • Location Share can be added to all plans for $6/mo
  • Once activated, plans can be changed or suspended after 3 months
  • $4/mo to suspend service

Garmin inReach Plans:

Safety Recreation Expedition
Monthly $14.95 $34.95 $64.95
Annual $11.95/mo $24.95/mo $49.95
# of Satellite Messages 10 40 Unlimited
Additional Messages 50¢/ea 50¢/ea N/A

Garmin inReach Plan Notes:

  • $29.95 activation fee for annual plans
  • $34.95 annual program fee for monthly (freedom accounts)
  • Unlimited Check-in (preset) messages are included in all plans
  • Unlimited Tracking/location points are included in the Recreation and Expedition plans. 10¢ each for Safety Plan
  • Free to suspend service after 30 days (must pay annual fee only)

Bivy Plans:

Basic Plus Unlimited Premium
Monthly $19.99 $34.99 $59.99 $69.99
Annual $14.99/mo $29.99/mo $54.99 $64.99
# of Satellite Messages 20 80 Unlimited Unlimited
Additional Messages 75¢/ea 50¢/ea N/A N/A

Bivy Plan Notes:

  • $0 Activation Fees
  • Unlimited Check-In messages (preset) are included with all plans
  • Once activated, plans can be changed or suspended after 4 months
  • Free to suspend service after 4 months

Spot Plans:

Basic Advanced Unlimited
Monthly $14.95 $29.95 $39.95
Annual $11.95/mo $19.95/mo $29.95
# of Satellite Messages 20 100 Unlimited
Additional Messages 25¢/ea 25¢/ea N/A

Spot Plan Notes:

  • $29.95 Activation Fee for all plans
  • $34.95 Annual Fee for monthly (Flex) plans
  • Unlimited Check-In messages (preset) are included with all plans
  • Once activated, plans can be changed or suspended after 4 months
  • Free to suspend service after 30 days for no fee (annual fee still applies)

Our Pick:

Best Satellite Communicator: Zoleo Satellite Communicator

Most of us really don’t need (or want) to stay in touch with those back home while we’re out in the wild. We don’t need to carry on full text conversations when we’re camping, hiking, fishing, sailing, or doing anything else off the grid.  What we need is the safety of being able to communicate with friends, family, and emergency services IF we need to.  The Zoleo gets the messaging and SOS functions done well.  And if you do choose to send a few more messages while outdoors, the Zoleo and its companion app can do that too. But the price of the Zoleo is what sets it apart.  It’s the cheapest device on our list and its service plans are some of the cheapest and most flexible of the bunch. It’s a great device.  It does everything the others do at a much lower price. If you’re looking for a satellite communicator, save your money for other gear and get the Zoleo.


Looking for other satellite communicator options? Read our review on the Garmin Inreach SE+

The Outward Overland Trailer

Restored 1968 Airstream Overlander Camping in Telluride, CO
Camping in our restored 1968 Airstream Overlander

5 years ago, I purchased and restored a 1968 Airstream Overlander Travel Trailer.  It was a LOT of work, but the finished product provided my family and I with a pretty killer medium for adventure.  We took some great trips in that Airstream and made some memories that we will all never forget. And, at least for me, the process of rebuilding the trailer from the ground up was fun and super educational about how RV systems worked.

We originally purchased the airstream with the idea that it would contain all of the gear necessary for a multi-day trip and that we could hook it up and go anywhere on a whim. After the trailer was ready for use, we quickly learned that our dream of it being the perfect camping vehicle was far off base.  First of all, it was huge.  Towing a 26ft trailer that weighs 6,000lbs isn’t something you do mindlessly.  Ensuring that you’re properly connected, all safety devices are in place and working correctly, and that the trailer is ready for travel takes time – usually over an hour – to feel confident that people and property are safe for the road.  Secondly, large travel trailers are not the most maneuverable vehicles, so proper planning had to be done far ahead of time to know that your destination could handle the size.  Finally, the trailer had a lot of great electrical systems on board – it was clearly meant to have power while being outdoors.  Locating sites that had available power took time and limited the locations to choose from.

Airstream Shell Sunset Reflection
One of the last pictures taken of the sunset reflecting on our Airstream before we sold it

The strongest feeling we had after a few years with the airstream was anticipated.  We missed being outdoors.  We would tow our shiny encapsulated tiny home for hours into the outdoors, only to feel as though we weren’t really in the outdoors.  For some, this is the point.  Having (almost) every luxury that home provides should make camping more comfortable.  But for us, we missed being more immersed in the elements.  We missed the sound of rain on the taut sides of tent.  We preferred cooking outdoors without worry of smoke filling the cabin of the airstream.  We wanted more living space than our airplane on wheels allowed.

So, a few years ago, we sold our airstream and started over.  We purchased a large and long-lasting canvas tent. We picked up a 3-burner outdoor propane stove. We bought a few canopies to give us various spaces protected from the rain – a screened bug tent and a 10×10 popup canopy. We even splurged on a queen-sized air mattress with a frame that’s raised off the ground.  With all our new gear, we were going to do camping right – at least by our standards.

Our new challenge quickly became apparent.  With all of this gear, how would we get it to the destination?  And how would we store it all in our already cluttered garage?

After some googling, I discovered the world of overlanding – vehicles (usually off-road ready) with camping setups that could be deployed far off the beaten path.  Having loved the free dispersed camping spots we had found with the airstream, I instantly connected with the idea of overlanding.  So I started searching for ideas on how to build my own overland trailer.  After watching hours of YouTube videos of DIY overland builds, I was growing excited about the challenge of building my own, but was hesitant to spend the time it would take during the build process. And summer was coming!

Then one day, I stumbled across a post on Offerup for a trailer that I thought could work well as a starting point for an overland trailer build.  The trailer was being used by a mobile auto-detailing business and I thought it was the perfect platform for what I had in mind.  So I bought it and brought it home.


The Outward Overland Trailer

The trailer I purchased was a lifted flat-bed trailer that had a 1966 Utility Body Company work truck bed mounted to it. Giving it 3 lockable compartments on either side of the trailer provided multiple blank canvases to build out the necessary systems.  On top of the 6 side compartments, a large front lockable compartment had been built along the front of the trailer and a 4′ x 1′ toolbox had been installed on the trailer tongue.  In all, the trailer came with 8 lockable compartments and had an open-air “truck bed” in the middle with a double-door tailgate at the back. To top it all off, the entire trailer was painted in a grey digital camo scheme that added some great character.

Overland Trailer Build Before
The mobile auto detailing trailer as we bought it

Over the past year, we have added a series of systems and components to make this trailer our basecamp when exploring the wild.  It’s not perfect and it’ll never be “done”, but it’s a constantly evolving hub that allows us to contain all of our needs when away from home in smart and creative ways.  It also can go further off the pavement and deeper in the sticks than most camping vehicles.  Below are the various systems and upgrades we’ve added to the trailer.

Electrical System

Our overland trailer has two 6-volt “golf cart” batteries wired in series for 210 amp hours of 12-volt power. For charging, it has a 120V 10amp battery charger when we have access to the grid and a 20amp MPPT solar charger with 180 watts of solar panels for when we don’t. We’ve installed a 1000watt pure sine wave inverter for the rare times we need 120v power on the go.  It also has a battery monitor to know exactly where our battery capacity (as well as input and output) is at any given time. The battery system is finished off with a switch panel with circuit breakers for the various systems that also includes usb and 12V DC “cigarette lighter” ports.

Overland trailer Electrical System
The batteries, solar charger, battery monitor and inverter switch in our overland trailer

Update: We’ve now added the GOLABS i200 Portable Power Station, a 256Wh LiFePO4 power station with a 200W pure sine wave inverter to the trailer.  It’s great for extending power to other campsite areas without the tether of an extension cord.  We can keep it charged by the trailer’s electrical system – either by utilizing a solar panel or by plugging it into the trailer’s inverter to charge.

Lid

We custom crafted a steel and fiberglass lid to cover the trailer bed and to protect our camping gear from the elements.  The lid is hinged on the front with gas strut lifts on the sides of the trailer to assist in opening and to keep it open.  The bottom of the lid has 3 rows of led strip lighting that illuminates the bed area of the trailer and provides campground lighting when open.  The lid is secured using 2 latch clamps that are lockable with padlocks. In the future, we’ll add a roof rack to the lid allowing for a planned shade awning, shower enclosure and rooftop tent.

Custom Overland Trailer Lid with lighting
With the lid raised, the led strip under lighting provides light to the campsite

Refrigerator

F40C4TMP 53qt 12V Portable Refrigerator in our Custom Overland TrailerIn our front left side compartment, we added a 53qt 12-volt refrigerator. We custom-built an aluminum tray for the fridge and mounted it in the compartment on heavy-duty locking drawer slides to both keep it in place when traveling and for easy access when needed.

To connect it to the electrical system, we use the included 12v DC cigarette lighter charger which plugs into a bed-mounted 12V DC outlet which is switched at the electrical panel.  With multiple compartments and ample space, this refrigerator has been a valuable addition to the trailer and allows us to cook using fresh ingredients when outdoors.


Water System

Water Heater and Outdoor Faucet on Custom Overland TrailerOur overland trailer’s water system is built around a 40-gallon water tank installed at the front of the trailer bed. In the right front side compartment, we installed a 12v 2.9 gallons per minute water pump that gives 50PSI of pressure to the system.

For hot water, we have a propane tankless water heater mounted to the back of the compartment door. The heater stows away neatly in the compartment when traveling or not in use.  For showers and for general water needs, we installed a faucet with a quick disconnect fitting made for RV use. We also plumbed hot and cold water to the kitchen on the other side of the trailer using PEX tubing and fittings.

Kitchen

By far the most complicated part of the build so far, our overland kitchen includes a deep rectangular sink with folding faucet, hot and cold water, 3 storage drawers and a slide-out countertop for food prep.

Made of baltic birch plywood, the entire kitchen is protected with flat marine-grade varnish to protect against spills and the elements.  The entire unit is on heavy-duty locking drawer slides.  For the space of one side compartment, we have a well-equipped kitchen that meets all of our needs.

Outdoor Kitchen on Custom Overland Trailer
Our custom-built outdoor kitchen slides out of the left rear compartment

Under Lid Storage on Custom Overland Trailer

Storage

Even utilizing compartments for the refrigerator, water system, and kitchen, we still have 3 compartments for storage on the sides of the trailer.  The front toolbox allows us to keep all of our tools and small miscellaneous gear secure. The main storage are is the area under the lid.  This storage area is 67″ long x 60″ wide and 26″ tall giving us ample room for all of our gear.  This space holds our Kodiak Canvas 10’x14′ Flex-Bow Tent, our Coleman Queen Airbed Cot, 3 awnings, 5 camping chairs, 2 extra water containers, multiple sleeping bags, mattress pads, and miscellaneous camping gear.  Since this space is locked and protected from the elements, we can store all of our gear here when we’re not camping and it becomes usable workspace when we are.


Roofrack

Next up on the upgrade list is a roof rack to take the trailer vertical.  We recently decided to purchase and modify this 800lb capacity truck bed roof rack rather than fabricate our own. We’ve received it, but have not yet had the chance to get it on the trailer.  We will be completing the installation in the coming weeks. The added height of the roof rack will allow us to mount an Overland Vehicle System 270-degree batwing awning to provide shade and cover over the kitchen and refrigerator area. Also from Overland Vehicle Systems, we’ll install a shower side room to the roof rack on the opposite side of the trailer that is close to the water system. Also under consideration for the roof rack is a rooftop tent.  If we end up going this route, it’s between the Smittybilt Overlander XL and the OVS Nomadic 3 Extended tents.

Conclusion

Our Overland Trailer has exactly what we need and is laid out exactly as we want – because we are building it custom for how we camp.  The build process allows us to be deeply connected with our systems – if something goes wrong, we know how it’s built and can quickly identify the causes.  We miss our Airstream Overlander for sure.  It was a work of art that got our family out into the woods, but our overland trailer allows us to go further and on our terms.

As we continue to add and upgrade our overland trailer, we’ll post more in-depth details of what we chose, how we did it, and why.  We’ll also be creating a series of more in-depth articles for each of our trailer systems to help those looking to do something similar. Stay tuned and check back often for more.

Gallery

Water Heater and Outdoor Faucet on Custom Overland Trailer
Under Lid Storage on Custom Overland Trailer
Outdoor Kitchen on Custom Overland Trailer
Outward Overland Trailer Build Before
The Outward Overland Trailer As We Bought It


Subscribe to Our Newsletter

Outward Space's gear reviews, outdoor tips, adventure stories, and more — all delivered straight to your inbox.

© 2022- Outward Spaces | Privacy Policy | website by VAUX digital