Outdoor Gear Reviews, Tips & Adventure Stories to Inspire an Outdoor Life

Month: February 2023

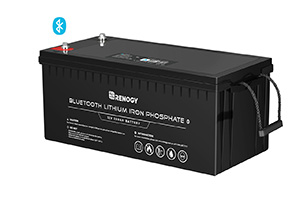
Renogy’s Lithium Iron Phosphate Battery with Bluetooth: A Game-Changer for RV and Marine Enthusiasts

12V 200Ah Lithium Iron Phosphate Battery w/ Bluetooth
Renogy’s 200Ah Lithium Iron Phosphate Battery includes lithium-ion technology with bluetooth connectivity.

Renogy’s Lithium Iron Phosphate Battery with Bluetooth is a game-changer for RV and marine enthusiasts who need a reliable power source for their off-grid adventures. This innovative battery not only offers the benefits of lithium-ion technology, such as lightweight design and high cycle count, but also includes a built-in Bluetooth module for remote monitoring and control.

In this article, we’ll explore the features and benefits of Renogy’s 12V 200Ah Lithium Iron Phosphate Battery, as well as how Bluetooth connectivity enhances the user experience. We will also look at real-life examples of the battery in action and compare it to other competing products and technologies. Finally, we will answer the question: Is Renogy’s Lithium Iron Phosphate Battery with Bluetooth worth the investment? Whether you’re a full-time RV adventurer or a weekend boater, this blog will help you make an informed decision about the best power source for your needs.

Benefits of Lithium Iron Phosphate Battery for RV and Marine Use

Renogy’s Lithium Iron Phosphate Battery is an excellent choice for RV and marine enthusiasts who need a reliable and efficient power source. Here are some of the key benefits of this battery:

  • Lighter weight and more compact size compared to lead-acid batteries – Lithium-ion batteries are up to 60% lighter than lead-acid batteries, making them easier to transport and install. – Lithium-ion batteries are also more compact, allowing for greater flexibility in placement and space utilization.
  • Longer lifespan and higher cycle count – Renogy’s Lithium Iron Phosphate Battery can last up to 10 years or 4,000 cycles, compared to lead-acid batteries, which typically last 2-3 years or 300-500 cycles. – This longer lifespan means that RV and marine enthusiasts can save money in the long run by avoiding frequent battery replacements.
  • Faster charging and more efficient power output – Lithium-ion batteries can charge up to 4 times faster than lead-acid batteries, allowing for quicker recharging times and less time spent waiting for the battery to charge. – Lithium-ion batteries also have a higher energy density, meaning they can provide more power output per unit of weight or volume.

Overall, the benefits of Renogy’s Lithium Iron Phosphate Battery for RV and marine use include greater portability, longer lifespan, faster charging, and more efficient power output. By choosing this battery, RV and marine enthusiasts can enjoy more time off-grid without having to worry about their power source.

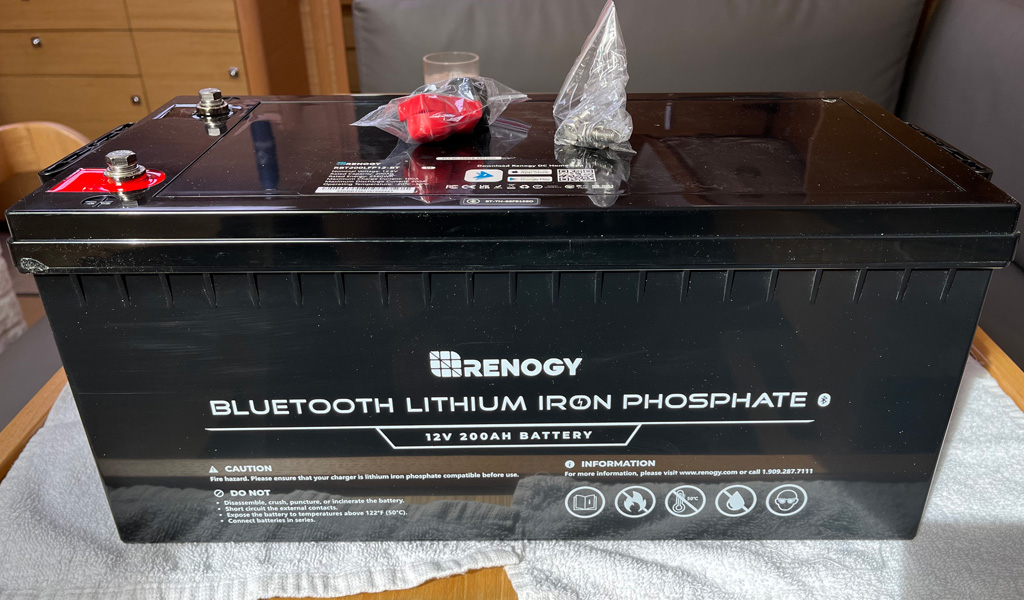
Features of Renogy’s 12V 200Ah Lithium Iron Phosphate Battery

Renogy’s 12V 200Ah Lithium Iron Phosphate Battery is a top-of-the-line power source for RV and marine enthusiasts. Here are some of the key features of this battery:

Battery capacity and voltage

The 12V 200Ah capacity provides ample power for most RV and marine applications. – The 12V voltage is compatible with most standard RV and marine electrical systems.

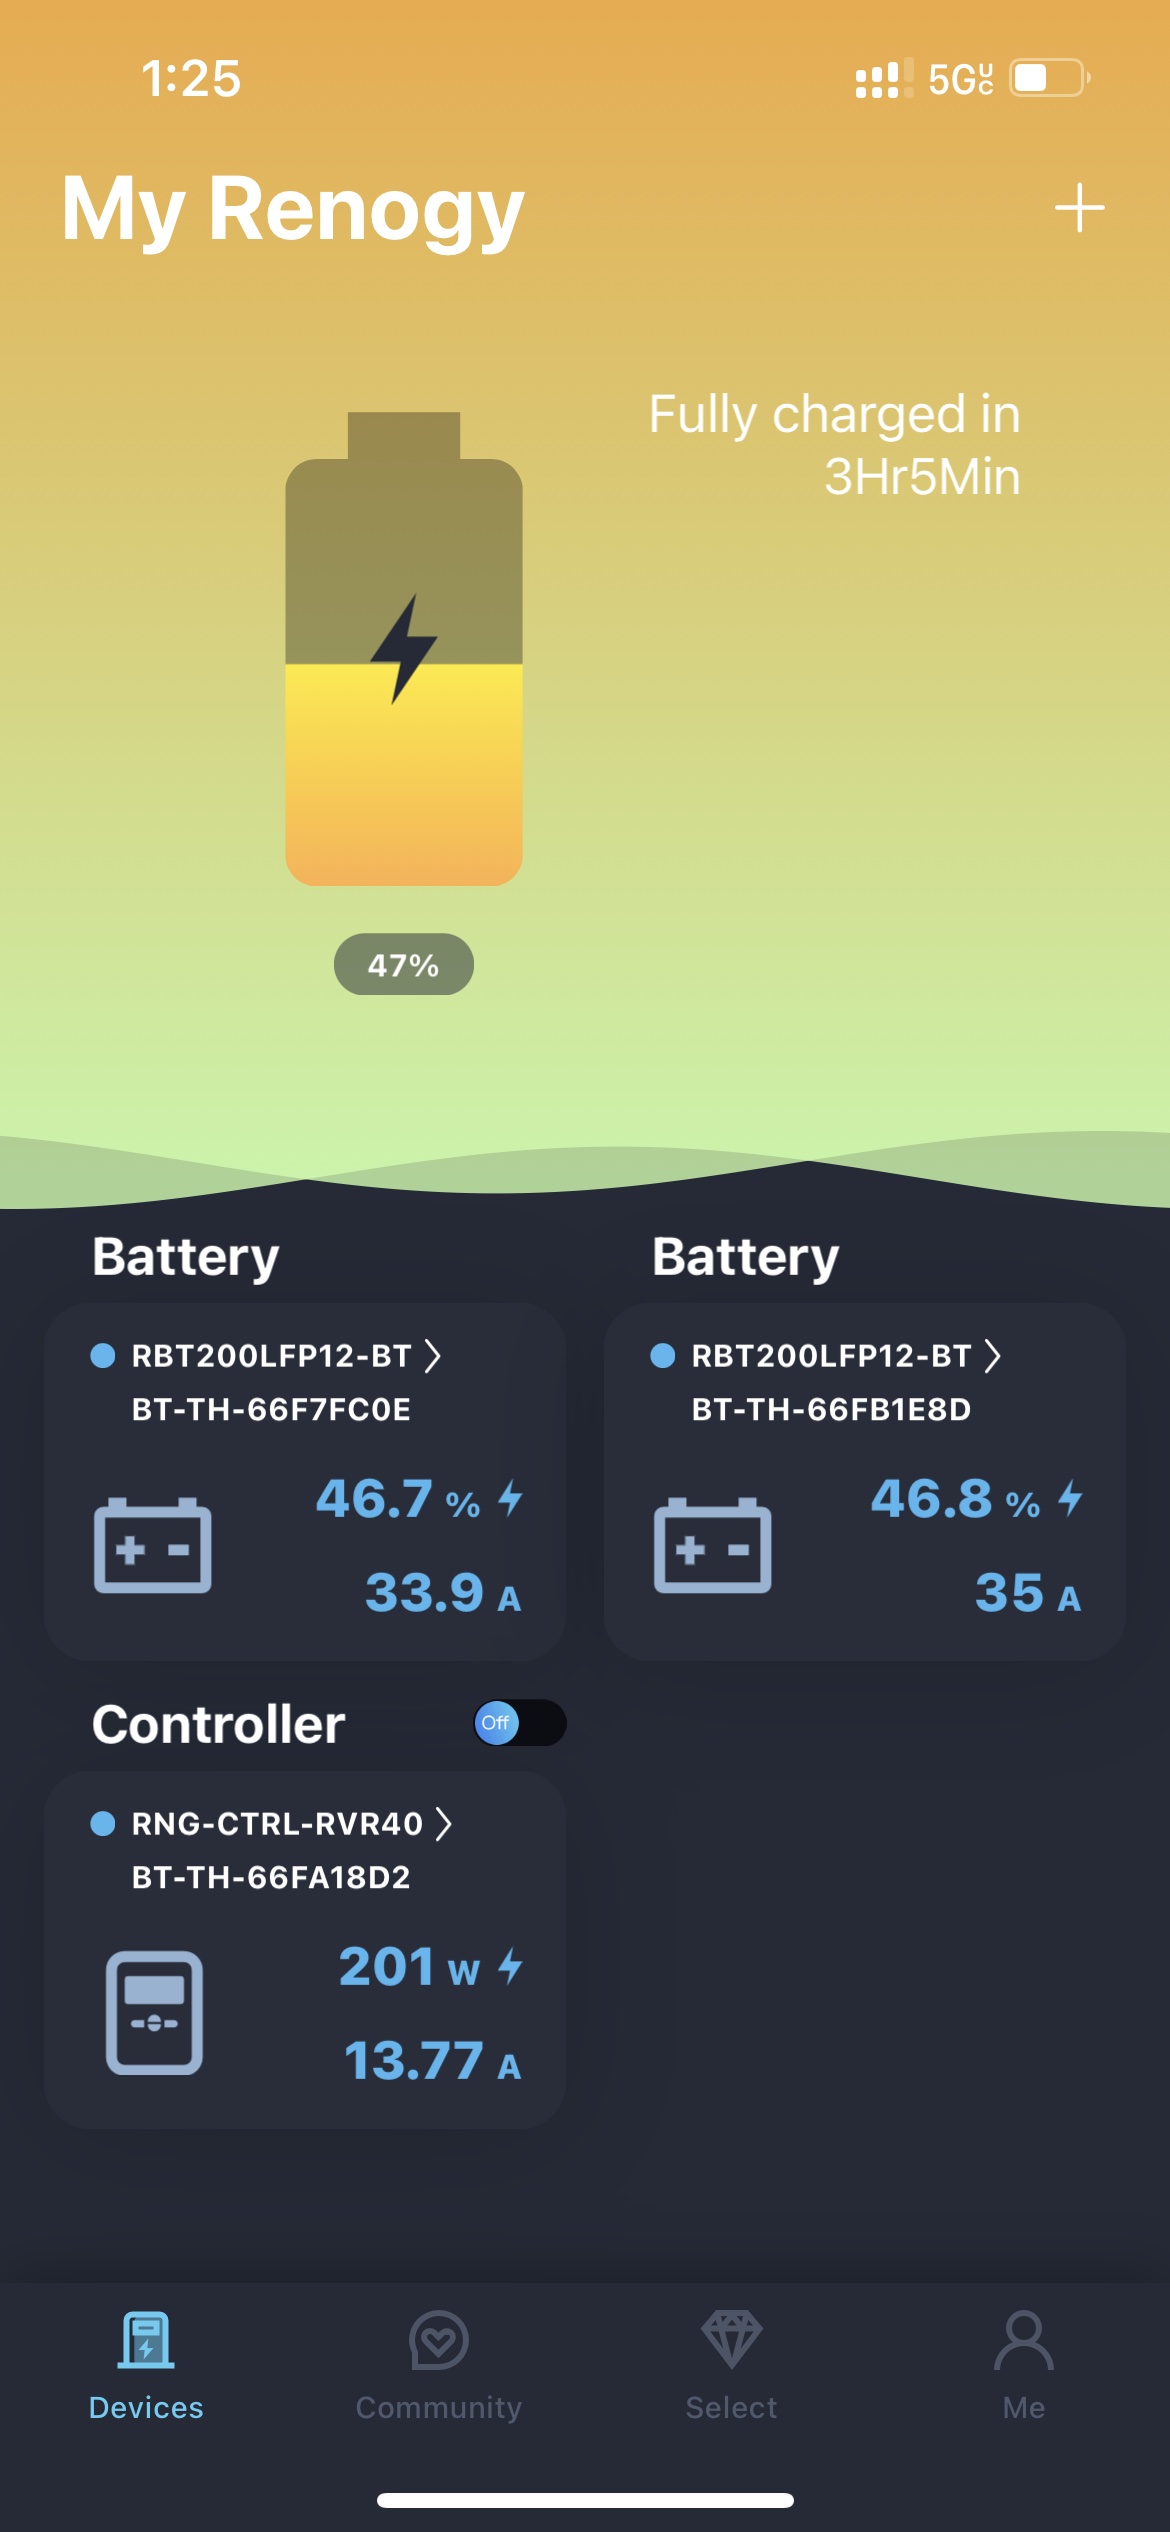
Built-in Bluetooth module for remote monitoring and control

Renogy’s Lithium Iron Phosphate Battery comes with a built-in Bluetooth module that allows for remote monitoring and control of the battery’s status and performance. – Users can download the Renogy app to their smartphones or tablets and easily track the battery’s charge level, voltage, temperature, and other parameters. – The app also allows users to control the power output and charging settings of the battery, making it easy to optimize the battery’s performance for different applications.

BMS (Battery Management System) for safety and optimal performance

Renogy’s Lithium Iron Phosphate Battery includes a sophisticated Battery Management System (BMS) that ensures safe and optimal performance. – The BMS monitors the battery’s temperature, voltage, and current, and protects the battery against overcharging, overdischarging, short circuits, and other hazards. – The BMS also balances the cell voltage to ensure that each cell is operating at the same level, which helps to prolong the battery’s lifespan.

Temperature control and protection

Renogy’s Lithium Iron Phosphate Battery includes a temperature sensor that monitors the battery’s temperature and adjusts the charging and discharging settings accordingly. – The battery is designed to operate within a wide temperature range, from -4°F to 140°F (-20°C to 60°C), making it suitable for use in a variety of environments. – The battery also includes a thermal fuse that provides an additional layer of protection against overheating.

Overall, the features of Renogy’s Lithium Iron Phosphate Battery make it a safe, reliable, and high-performance power source for RV and marine enthusiasts. The built-in Bluetooth module and Battery Management System provide advanced monitoring and control capabilities, while the temperature control and protection features ensure safe and optimal performance in a range of environments.

How Bluetooth Connectivity Enhances the User Experience

Renogy DC Home App
Renogy’s DC Home app connects via bluetooth to display real-time battery data

One of the standout features of Renogy’s Lithium Iron Phosphate Battery is the built-in Bluetooth module, which allows for remote monitoring and control via a smartphone or tablet. Here are some of the ways Bluetooth connectivity enhances the user experience:

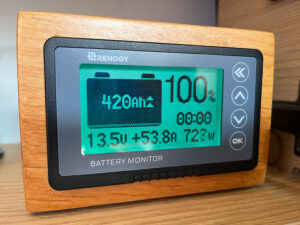
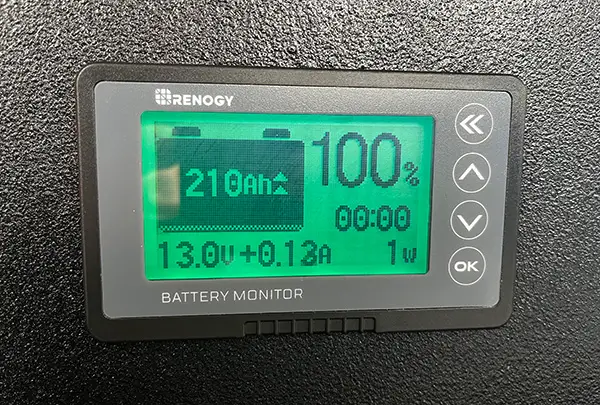
Real-time monitoring of battery status and performance

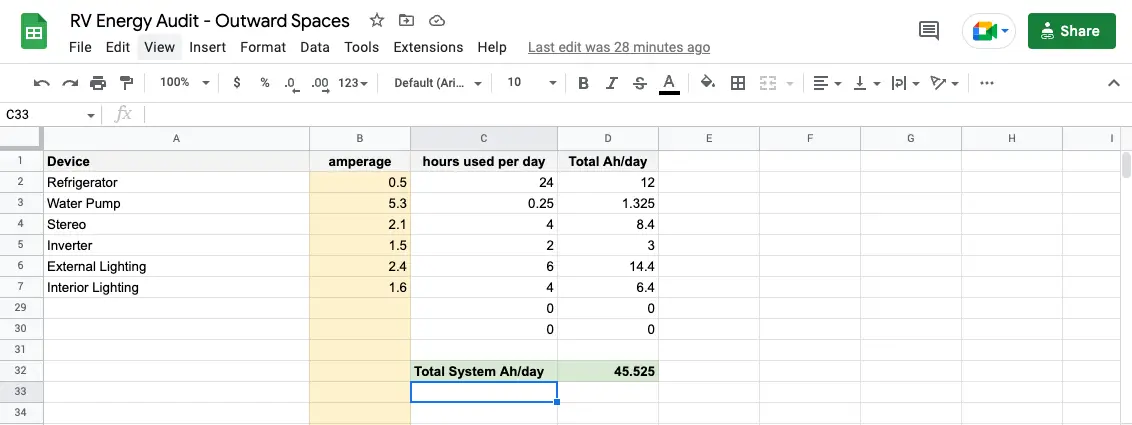
With the Renogy app, users can easily monitor the battery’s charge level, voltage, temperature, and other parameters in real-time. – This allows users to keep track of their power usage and adjust their behavior as needed to optimize battery life.

Remote control of power output and charging settings

The Renogy app also allows users to adjust the power output and charging settings of the battery remotely. – This is especially useful for RV and marine enthusiasts who need to optimize their power usage for different applications, such as running appliances or charging electronics.

Alerts and notifications for battery health and performance

The Renogy app can send alerts and notifications to users when the battery is nearing its maximum or minimum charge level, or when there is a problem with the battery’s performance. – This allows users to take action quickly and avoid damaging the battery or compromising their power supply.

User-friendly interface and easy setup

The Renogy app is user-friendly and easy to set up, even for those who are not tech-savvy. – The app provides clear and intuitive displays of battery status and performance, making it easy to understand and use.

Overall, Bluetooth connectivity enhances the user experience of Renogy’s Lithium Iron Phosphate Battery by providing advanced monitoring and control capabilities that make it easy to optimize battery performance and avoid problems. By using the Renogy app, RV and marine enthusiasts can stay on top of their power usage and enjoy a worry-free off-grid experience.

Examples of Renogy’s Lithium Iron Phosphate Battery in Action

To better understand the capabilities of Renogy’s Lithium Iron Phosphate Battery with Bluetooth, let’s take a look at some potential examples of the battery in action.

RV Living

John and Jane are full-time RVers who rely on their Renogy Lithium Iron Phosphate Battery to power their home on wheels. – They use the Renogy app to monitor their battery’s charge level and adjust their power usage accordingly. – With the battery’s long lifespan and high capacity, they can enjoy extended off-grid stays without worrying about running out of power.

Marine Adventures

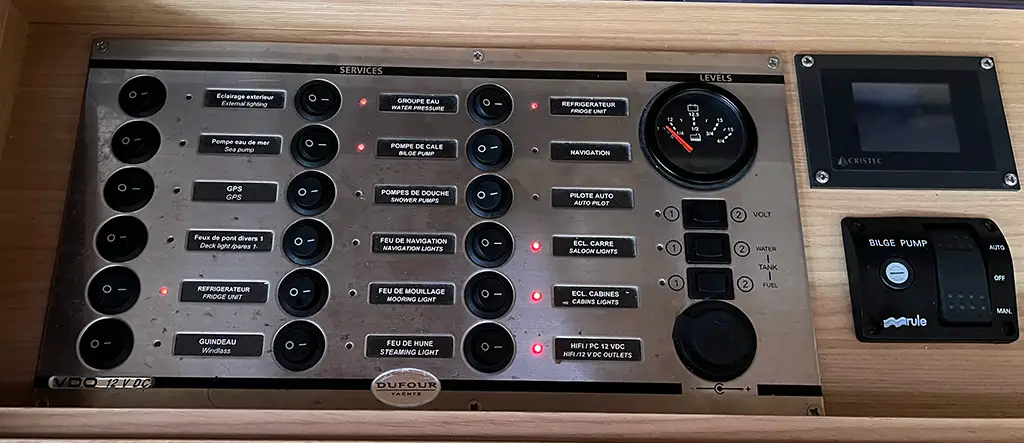
Tom and Susan are avid boaters who love exploring remote coves and anchorages. – They rely on their Renogy Lithium Iron Phosphate Battery to power their onboard electronics and appliances, such as lights, refrigerators, and navigation systems. – The battery’s Bluetooth connectivity allows them to monitor their power usage and optimize their charging settings to maximize their time on the water.

Off-Grid Living

Mark and Sarah live in a remote cabin in the mountains, far from the nearest power grid. – They use their Renogy Lithium Iron Phosphate Battery to power their home’s electrical system, which includes lights, appliances, and a solar panel array. – With the battery’s advanced monitoring and control capabilities, they can manage their power usage efficiently and avoid damaging the battery.

These case studies demonstrate the versatility and reliability of Renogy’s Lithium Iron Phosphate Battery in a variety of off-grid scenarios. Whether living in an RV, exploring the open sea, or living off the grid in a remote location, Renogy’s battery provides a safe, reliable, and high-performance power source that can be easily monitored and controlled via Bluetooth connectivity.

Examples of Uses for the Renogy Lithium Battery

Comparison with Competing Products and Technologies

While Renogy’s Lithium Iron Phosphate Battery with Bluetooth is a standout product in the RV and marine battery market, it’s important to compare it to other competing products and technologies to understand its strengths and weaknesses.
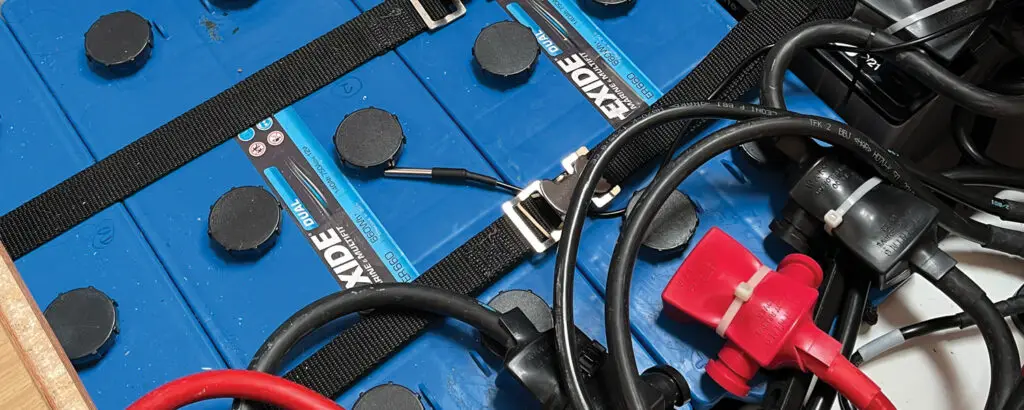
Lead-Acid Batteries

Lead-acid batteries have been the standard battery technology for RV and marine use for many years. – While they are relatively cheap and easy to find, they have several drawbacks compared to lithium iron phosphate batteries. – Lead-acid batteries are heavier and bulkier than lithium batteries, making them more difficult to install and transport. – They also have a shorter lifespan and require more maintenance, including regular equalization and watering.

Lithium Cobalt Oxide Batteries

Lithium cobalt oxide batteries are a type of lithium-ion battery that are commonly used in consumer electronics like smartphones and laptops. – While they are lighter and have a higher energy density than lead-acid batteries, they are less suitable for RV and marine use due to their lower lifespan and safety risks. – Lithium cobalt oxide batteries are more prone to overheating and thermal runaway, which can lead to fires or explosions.

Other Lithium Iron Phosphate Batteries

While there are several other lithium iron phosphate batteries on the market, Renogy’s battery stands out for its Bluetooth connectivity and advanced monitoring and control capabilities. – Other lithium iron phosphate batteries may be cheaper or have a higher capacity, but they lack the user-friendly interface and remote control features of Renogy’s battery.

Overall, Renogy’s Lithium Iron Phosphate Battery with Bluetooth stands out from its competitors for its advanced features, safety, and reliability. While it may be slightly more expensive than other battery technologies, its long lifespan and ease of use make it a worthwhile investment for RV and marine enthusiasts who prioritize performance and convenience.

Is Renogy’s Lithium Iron Phosphate Battery with Bluetooth Worth the Investment?

After exploring the benefits, features, real-life examples, and comparisons of Renogy’s Lithium Iron Phosphate Battery with Bluetooth, the question remains: is it worth the investment for RV and marine enthusiasts?

The answer is a resounding yes. Renogy’s battery is a game-changer for off-grid living, providing a reliable and efficient power source that is easy to monitor and control via Bluetooth connectivity. Its long lifespan, high capacity, and safety features make it a superior choice to traditional lead-acid batteries and other lithium-ion technologies.

While Renogy’s battery may be slightly more expensive than other battery options, its advanced features and user-friendly interface justify the investment for those who prioritize performance and convenience. Plus, its Bluetooth connectivity and monitoring capabilities can save users money in the long run by optimizing power usage and extending the life of the battery.

In conclusion, Renogy’s Lithium Iron Phosphate Battery with Bluetooth is a highly recommended investment for RV and marine enthusiasts who want to enjoy the freedom of off-grid living without sacrificing performance or safety.

Learn More at Renogy’s Website

12V 200Ah Lithium Iron Phosphate Battery w/ Bluetooth

12V 200Ah Lithium Iron Phosphate Battery w/ Bluetooth

View at Renogy.com

Solo Stove Yukon Review

Solo Stove Yukon Review
The Yukon is Solo Stove’s largest firepit making it perfect to pull double duty in the backyard or at the campground.

Solo Stove Logo
When it comes to enjoying a campfire or backyard bonfire, the Solo Stove Yukon is a popular option for those who want a smokeless and efficient fire pit. Solo Stove is known for its innovative designs and high-quality materials, and its largest firepit, the Yukon, is no exception.

In this review, we will be taking an in-depth look at the Solo Stove Yukon to see if it’s worth the investment. We’ll explore the features, pros and cons, and compare it to alternatives on the market to help you make an informed decision about whether this smokeless fire pit is the right choice for your needs.

If you’re in the market for a new fire pit, or simply curious about the Solo Stove Yukon, keep reading to learn more.

Features

Design and Construction

The Solo Stove Yukon is not your standard firepit. It’s made from premium 304 stainless steel, which is known for its durability and resistance to rust and corrosion. The fire pit is designed with double walls, allowing air to be drawn in from the bottom and heated up as it rises to feed the fire. This design creates a more complete combustion, resulting in less smoke and fewer sparks.

Performance

The Solo Stove Yukon has a unique airflow system that creates a secondary burn of hot air and smoke inside the fire pit. This helps to burn off any remaining smoke and produces a clean-burning fire that emits less smoke and fewer sparks than traditional fire pits. The newest Yukon 2.0 model also comes with a removable ash pan, making cleanup a breeze.

Size and Portability

The Solo Stove Yukon has a large 27-inch diameter and stands at 16 inches tall. It’s designed to hold larger logs, which means you can enjoy longer burn times and fewer interruptions to add more wood. Despite its size, the Yukon is surprisingly portable, with a weight of 38 pounds. It’s easy to move around the yard or pack up for a camping trip.

Ease of Use

The Solo Stove Yukon is designed to be easy to use, with no complicated setup required. Simply place the fire pit in your desired location, add your wood, and light the fire. The fire pit also has a stainless steel ring around the top that provides a safe and convenient place to rest your feet or roast marshmallows.

Overall, the Solo Stove Yukon has a well-designed and high-quality construction that provides superior performance compared to traditional fire pits.

Pros and Cons

Solo Stove Yukon Review
Double-wall construction with advanced airflow allows the Solo Stove Yukon to burn hotter and more efficiently – with less smoke.
Pros

Smokeless Technology – The Solo Stove Yukon’s unique double-wall design creates a more complete combustion, resulting in a fire that emits less smoke and fewer sparks than traditional fire pits. This makes it an excellent option for those who want to enjoy a fire without annoying their neighbors or worrying about the environmental impact.

High-Quality Materials – The Yukon is made from premium 304 stainless steel, meaning that this fire pit is built to last and can withstand outdoor conditions for years to come. While it’s certainly an investment, you can be sure that the Solo Stove Yukon is built with materials that will endure a lot of use.

Versatile Use – The Solo Stove Yukon is not just limited to backyard use. It’s also a great option for camping trips, beach parties, or any other outdoor activity where you want to enjoy a fire. Its portability and ease of use make it a convenient option for any outdoor adventure. At only 38 lbs, the Yukon can be transported easily to wherever you want to enjoy a fire.

Cons

Price – The Solo Stove Yukon is definitely a premium product, which means that it comes with a higher price tag than traditional fire pits. While the cost is justified by its unique features and superior performance, it may not be feasible for everyone’s budget.

Weight – While the Solo Stove Yukon is designed to be portable, it’s still a fairly heavy fire pit, weighing in at 38 pounds. This may not be ideal for those who plan on moving it frequently or packing it up for camping trips.

Overall, the Solo Stove Yukon’s pros outweigh its cons. Its smokeless technology, high-quality materials, and versatile use make it a great investment for those who want to enjoy a superior fire pit experience.

Comparison with Similar FirePits on the Market

Solo Stove Yukon vs. Breeo X Series 36

The Breeo X Series 36 is another smokeless fire pit that is similar in size and price to the Solo Stove Yukon. While both fire pits offer smokeless technology, the Breeo X Series 36 has a slightly different design that creates a more efficient burn. The Breeo fire pit also has a larger opening and a more versatile cooking system, making it a great option for those who want to cook over an open flame. However, the Solo Stove Yukon has a more durable construction and a more portable design, making it a better option for those who want to use it for camping trips or other outdoor activities.

Solo Stove Yukon vs. Tiki Brand Fire Pit

The Tiki Brand Fire Pit is a more affordable option than the Solo Stove Yukon, but it does not offer the same smokeless technology or high-quality construction. While the Tiki fire pit is designed to be portable, it’s not as durable as the Solo Stove Yukon and may not hold up as well over time. Additionally, the Tiki fire pit emits more smoke and sparks than the Solo Stove Yukon, which may not be ideal for those who want to use it in a residential area or at a campground.

Solo Stove Yukon vs. Outland Living Firebowl

The Outland Living Firebowl is another popular option for those looking for a portable and easy-to-use fire pit. While it’s more affordable than the Solo Stove Yukon, it doesn’t offer the same smokeless technology or superior performance. The Outland fire pit also has a smaller size and a lower heat output than the Yukon, which may not be ideal for larger gatherings or colder nights.

Overall, while there are other options on the market for portable fire pits, the Solo Stove Yukon’s combination of smokeless technology, high-quality construction, and versatile use make it a standout option for those looking for a superior fire pit experience.

Our Verdict

We love our Solo Stove Yukon.  We primarily use it in our backyard but it’s light enough to bring along when we head out camping.  Its advanced airflow design provides a more efficient burn that provides more heat with less smoke. With its clean, modern stainless steel design, it looks amazing too!

The Solo Stove Yukon is a high-quality, smokeless fire pit that offers superior performance and design. Its unique construction creates a more efficient burn, resulting in less smoke and fewer sparks. The fire pit is made from durable 304 stainless steel, which means it’s built to last and can withstand outdoor conditions for years to come. Its portability and ease of use make it a great option for backyard gatherings, camping trips, and other outdoor activities.

While the Solo Stove Yukon has a higher price tag than traditional fire pits, its superior performance and construction justify the investment. In comparison to other similar products on the market, the Solo Stove Yukon stands out for its combination of superior performance, high-quality construction, and versatile use.

Overall, if you’re looking for a high-quality, versatile, and easy-to-use fire pit, the Solo Stove Yukon is definitely worth the investment.

Conclusion

The Solo Stove Yukon is a top-of-the-line fire pit that offers impressive performance, innovative design, and easy portability. Its smokeless technology, high-quality construction, and efficient burn make it a standout option for those who want a superior fire pit experience.

While it comes with a higher price tag than traditional fire pits, the Solo Stove Yukon is a worthwhile investment for those who want to enjoy a relaxing and inviting atmosphere without worrying about smoke and sparks. Its versatility also makes it a great option for outdoor activities such as camping trips, picnics, and backyard gatherings.

Overall, if you’re looking for a superior fire pit that offers impressive performance and durability, the Solo Stove Yukon is a great investment. Its innovative design and smokeless technology make it a standout option in the market, and its positive customer reviews speak to its superior performance and construction. With the Solo Stove Yukon, you can enjoy a cozy fire without worrying about smoke, sparks, or environmental impact.


Solo Stove YukonSolo Stove Yukon

Pros:
– Smokeless Technology
– High-Quality Materials
– Versatile Use

Cons:
– Price
– Weight

View on SoloStove.com

How to Conduct an Energy Audit on a Recreational Vehicle

RV Energy Audit
An energy audit can help determine the energy efficiency of your electrical system and make sure it’s sized appropriately

When exploring wild spaces in an RV, van, travel trailer, or boat, it’s important for your vehicle to have an electrical system that will keep your systems running for the duration of your trip.  If your vehicle’s electrical system isn’t up to the task or if you want to upgrade your power capabilities, it’s vital to start with an energy audit. A complete energy audit will provide important information about your electrical system to help you make the right choices for your vehicle, usage, and budget.

What is an Energy Audit?

An energy audit is a comprehensive inspection of your energy typically usage used to determine ways to conserve energy or to properly size power systems.  In your home, you may hire a professional to conduct an energy audit to look for opportunities to save energy or to size a solar system.  For an RV, van, travel trailer, or other off-grid outdoor vehicles, an energy audit can help you determine the size of batteries or the number of solar panels you need.

Conducting an energy audit looks at all of your electronic devices, how much you use them, and helps establish a target amount of power you’ll need to power your devices.  For recreational vehicles, this target power number is usually calculated in amp hours per day. For example, you might conduct an energy audit and determine that when you’re boondocking, or camping off-grid, your RV typically uses 50 Ah of power per day.

Benefits of Conducting an Energy Audit on your RV, Van, or Travel Trailer

1. An Energy Audit Determines Your Power Storage and Power Generation Needs

Each of us uses power differently. Some vigilantly turn off lights and other devices when they aren’t in use.  Others prefer to have every electronic luxury all going at the same time.  Conducting an energy audit on your RV, van, travel trailer, or boat based on how you use it will calculate your unique power needs.  Once you know how much power you use, you can ensure your batteries, solar panels, or generator are sized appropriately.

2. An Energy Audit helps you Better Understand your Electrical System

Whether you purchase an RV or build your own electrical system for your van, it’s important to know how your electrical system is designed and how much each device uses.  An energy audit provides you with this information per device.

3. An Energy Audit Identifies What Devices Should be Upgraded to be More Energy Efficient

Knowing what each device in your electrical system consumes lets you make better decisions about your system.  Discovering which devices consume a large percentage of your power will help identify which device upgrades will save the most power and allow you to extend your trips.

How to Conduct an Energy Audit

Step 1: Measure the Current Draw of Each of your Devices

Most RV, van, travel trailer, or boat electrical systems have a battery monitor.  Some smaller or older systems have only a voltage meter (voltmeter) – allowing you to “guess” your battery capacity percentage based on the voltage of your batteries.  To conduct an energy audit, a voltmeter won’t do the trick.  You’ll need a device that can measure the current (in amps) of each device.

Renogy 500A Battery Monitor with Shunt
The Renogy Battery Monitor measures your current draw (in amperage) of your electrical system

If you don’t have a system monitor that can measure amperage draw, we recommend picking up Renogy’s 500A Battery Monitor (Read our full review of the Renogy Battery Monitor). At under $100, Renogy’s battery monitor includes a shunt that you install between all of your devices and your battery.  This shunt measures the amount of current draw coming out of your battery in real time and displays the result on the battery monitor screen.

Turn off all devices in your system

To measure the current draw of each device, start by turning off all devices in your system.  Once all devices have been turned off, your battery monitor should be reading at or near 0 Amps.  If your monitor doesn’t read 0 Amps with all devices turned off, check to make sure you haven’t forgotten any.  If after double-checking, you still have some current draw in your system, don’t worry.  This small amount of power may simply be “parasitic loss” – a small amount of power that your system draws even when off.  If your number is more than zero, simply make note of the amount and subtract it from your measurements of each device.

Measure each device

Once you have all devices off, turn one device on and measure its current draw in amps.  It’s helpful to have a spreadsheet handy for this step to record your measurements.  Make a list of each device in your system and record its current draw in amps next to it.  We’ve created a simple spreadsheet to get you started –download it here. You can add and level each device in the first column and record its current draw in the ‘amperage” column.

Download our Energy Audit Spreadsheet

DIY Energy Audit Spreadsheet
Download our Energy Audit Spreadsheet to record your device readings and to calculate your total system usage.
Step 2: Determine How Much You Use Each Device Per Day

Now that you’ve identified how much power each device in your system uses when it’s on, you’ll need to note how much time you use each device for.

Add your daily usage (in hours) to the spreadsheet under the “hours used per day” column. For devices that are on all the time, like a refrigerator, coming up with these numbers is easy.  For intermittent devices, like a water pump, try to project how many minutes you’re water pump is on per day. If you typically use your water pump 10 times per day for an average of 1 minute, then you use your water pump for 10 minutes per day or .167 hours per day.

Imagine an average day

When determining how many hours per day you use each device, we recommend thinking about an average day. – not a day of heavy use for a particular device. For example, use usage numbers from a typical sunny day where you don’t use your lights during the day as opposed to a dark, stormy day where you might use interior lighting during the day.

Error on the high side

To determine your power needs, don’t cheat these numbers. The end result of your energy audit is the projected daily usage total of your system.  If you typically use lights for 4hrs/day but want to cut back to 2/hrs per day to save power, enter the higher number for this exercise.

An electrical system that is bigger than you need is better than one that is less than you need – provided you have the budget. If you are going to guess on your usage, guess on the higher side.

Step 3: Establish your daily usage numbers

To establish how much power each device in your system uses per day, multiply the amperage of the device by the number of hours it will be used each day.

Amperage X Hours/Day = Total Amp Hours per Day

If you’re using our spreadsheet, it will do the math for you for each device.  In the “Total Ah/day” column, you’ll discover the amount of power each device listed uses in your system.  Because batteries are usually labeled in amp hours (Ah), keeping your energy audit recording in Ah will help more easily determine how your usage stacks up against your storage capacity.

Once you have your daily Ah totals for each device, add them all together to discover your total system needs per day in Ah.  If you are using our spreadsheet, you’ll find this number at the bottom in green and labeled “Total System Ah/day”.

DuFour 460 Grand Large 12V Switch Panel
Using your vehicle’s 12V switch panel, turn on each device individually to measure its current draw

Now That You Know Your Daily Power Needs, You Can Make Better Decisions About the Future of Your System

Now that you know your usage, you can compare that number to your battery capacity.  If you have a 200Ah battery bank, 200Ah of storage divided by 50Ah of daily usage will give you 4 days of power before needing to recharge. If you want to extend the time you can camp off-grid, you may look at adding a solar system.  Let’s say you want to target a camping duration of 7 days with your system. For the 3 additional days, you’ll need to generate an additional 150Ah of power. Having 7 days to generate 150Ah of power means you’ll need a solar system that can generate around 21.5 Ah per day.

Knowing your daily power usage may indicate that you need to add to your battery bank or, if that’s not possible, reduce your power usage by using higher-power devices less each day.  If your current electrical system doesn’t fit your power needs, you only have 2 options:

  1. add more power (storage capacity with batteries, charging capacity with solar, generator, etc)
  2. decrease your power usage (limit your usage, shorten your trip durations, etc)

There are a lot of ways to accomplish either (or both) items above.  In the end, you’ll need to decide what alterations your electrical system needs based on your needs and your budget.  By conducting an energy audit, you’ll now know exactly how much power each device in your system draws, your daily system usage, and how you’re system should be sized.  You’ll have a lot more useful information to make informed decisions to improve your electrical system and to save money in the process.

Download our Energy Audit Spreadsheet

Odoland Camping Cookware Kit Review

Odoland Camping Cookware Kit
The Odoland Camping Cookware Kit includes a stove, a large pot, a small pot, and a spork – and they all fit in a small nylon carrying bag

Camping is a fantastic way to disconnect from the hustle and bustle of daily life and immerse yourself in nature. And what’s better than cooking a hot, delicious meal in the great outdoors after a long day of hiking, fishing, or exploring? That’s where the Odoland Camping Cookware Kit comes in.

The Odoland Camping Cookware Kit is a comprehensive set of cooking tools that have been designed specifically for camping enthusiasts. It comes with everything you need to whip up a delicious meal while on the go, including a stove, a large pot, a small pot, and a spork. But is the Odoland Camping Cookware Kit really worth the investment? In this article, we’ll provide you with a comprehensive review of the Odoland Camping Cookware Kit, including an overview of the contents, its performance in the field, and its durability and portability. We’ll also compare it to other camping cookware kits on the market to help you make an informed decision about whether or not it’s the right fit for your next camping adventure. So, let’s dive in and take a closer look at the Odoland Camping Cookware Kit!

Overview:

The Odoland Camping Cookware Kit is a 6-piece set of cooking tools designed for camping, hiking, and other outdoor activities. The kit includes a non-stick pot and smaller pot, a butane stove, a spork, a cleaning cloth, and a nylon carrying bag.

One of the standout features of the Odoland Camping Cookware Kit is its compact size and lightweight design, making it easy to carry and pack for any outdoor adventure. The pots are made from high-quality aluminum alloy, which is lightweight yet durable and resistant to wear and tear. The pots also have a non-stick coating, making them easy to clean and preventing food from sticking to the surface.

The kit also includes a butane stove that is perfect for boiling water or making tea or coffee. The spork is made from high-quality stainless steel and folds for easy storage. Finally, the kit includes a cleaning cloth for easy cleanup after meals.

Overall, the Odoland kit is a comprehensive and compact set of cooking tools that is perfect for taking outdoors. Its lightweight and durable design, non-stick coating, and ergonomic utensils make it a great choice for any outdoor enthusiast who wants to cook a hot meal in the wilderness.

Performance:

Odoland Camping Cookware Kit
The stove’s flame is easily adjustable and boils water quickly.

We had the opportunity to put the Odoland Camping Cookware Kit to the test on a recent trip to the mountains, and we were impressed with its performance. The kit was easy to pack and transport and the carrying bag kept all the pieces organized and secure during travel.

When it came time to cook, the large pot heated up quickly and evenly on the included stove. The non-stick coating worked as advertised, preventing food from sticking to the surface and making cleanup a breeze. We also appreciated the size of the pot and pan – they were just large enough to cook meals for 2-3 people, but not so large that they were bulky or heavy to handle.

The stove was also a standout feature of the kit, as it boiled water quickly and efficiently for our morning coffee and tea. The stove uses a small isobutane canister (not included) that screws onto the stove and serves as a stable base for the stove.  During our first test, we were able to boil 550ml of water to a boil in exactly 6 minutes in chilly 18-degree weather. A second attempt took 3:30 to boil 325ml of water. The pots are rightly sized to store your isobutane canister along with the contents of the cookware kit – making your entire cookware setup packable in the included bag.

The spork works well enough and the cleaning cloth made cleanup easy. The spork did feel a bit flimsy at times and we’d probably recommend upgrading to a more solid titanium spork if you’ll use it often, but the spork included with the kit works in a pinch.

Overall, we were pleased with the performance of the Odoland Camping Cookware Kit. It worked well for our needs and was easy to use and clean. We would definitely recommend it to anyone who wants a compact and functional set of cooking tools for their outdoor adventures.

Durability and Portability:

Odoland Camping Cookware Kit
All contents of the kit (and a butane canister) fit snugly in the nylon storage bag

When it comes to camping gear, durability and portability are two critical factors. We were pleased to find that the Odoland Camping Cookware Kit held up well in both categories.

The aluminum alloy construction of the pots felt sturdy and durable, and we didn’t experience any issues with warping or bending during use. The non-stick coating on the pots also held up well, even after several uses, and didn’t show any signs of wear or flaking.  We suspect that with a lot of use, the non-stick ability of the pots will suffer, but that is expected in such an inexpensive set.

The stove folds up quickly and easily for storage and held up well in our testing. The kit includes a small plastic case dedicated to the stove that protects it during transit.

In terms of portability, this kit is a great choice for those who want a compact and lightweight set of cooking tools. The nylon carrying bag kept everything organized and protected during travel, and the entire kit fit easily into our backpack without taking up too much space or adding too much weight.

Overall, we found the Odoland Camping Cookware Kit to be both durable and portable, which are two critical factors for any outdoor gear. We were pleased with how well it held up during our trip and how easy it was to transport from place to place.

Comparison to Other Camping Cookware Kits:

The market for camping cookware kits is vast, with a variety of options available for outdoor enthusiasts. We wanted to compare the Odoland Camping Cookware Kit to other camping cookware kits on the market in the past to see how it stacks up.

Compared to other camping cookware kits, what stands out about the Odoland kit is its great value. As a complete kit for under $30, it stacks up well against similar camping sets costing twice as much. The Odoland Camping Cookware Kit proves that you don’t need to spend a ton on a compact stove and cookware set – saving you money for other outdoor equipment.

In terms of durability, the Odoland Camping Cookware Kit is clearly made of cheaper materials than more expensive camping cookware sets.  If you are looking to use a camping cookware kit like this on 5-10 trips per year, we’d recommend getting splurging on a more durable kit that will hold up to the abuse.  Though for most people venturing outdoors a few times a year, the Odoland Camping Cookware Kit will perfectly fit the bill.

One area where the Odoland Kit excels compared to other kits is portability. The entire kit is lightweight and compact, which makes it easy to pack and transport for camping trips. The nylon carrying bag is also a nice touch, as it keeps everything organized and protected during travel.

Overall, we found the Odoland Camping Cookware Kit to be a great value for its price and a solid choice for those looking for a compact and functional set of cooking tools for camping. While it may not be the most premium option on the market, it certainly holds its own against other camping cookware kits in its price range.

Our Verdict:

Odoland Camping Cookware Kit
When attached to the stove, the isobutane canister serves as a sturdy base to cook on.

After putting the Odoland Camping Cookware Kit to the test, we can confidently say that it’s a great choice for anyone looking for a compact and functional set of cooking tools for camping. The kit includes everything you need for basic cooking needs all packed neatly in a nylon carrying bag.

We were impressed with the performance of the kit, as the pots heated up quickly and evenly, the non-stick coating worked well, and the isobutane stove boiled water efficiently. The spork is just ok but it works in getting food to your mouth effectively.

We were also pleased with the durability and portability of this campware set. The aluminum alloy construction felt sturdy, and the entire kit was lightweight and easy to transport.
Compared to other camping cookware kits in its price range, we found the Odoland kit to be a great value. It’s not the most premium option on the market, but it certainly holds its own against other kits in its price range.

We highly recommend the Odoland Camping Cookware Kit to anyone looking for a reliable and compact set of cooking tools for their outdoor adventures. With its solid performance, durability, and portability, it’s an excellent choice for any camping trip.  We especially think it’s a great pickup for those just starting to venture outdoors with its low price and solid feature set for the money.


Odoland Camping Cookware Set

Pros:
– Complete Cooking Set
– Lightweight & Packable
– Inexpensive

Cons:
– Spork is Just OK
– Not as High Quality as More Expensive Sets

Buy at Amazon


The Outward Overland Trailer: Electrical System Design & Diagram

Electrical System in the Outward Overland Trailer

Jump to the Outward Trailer Wiring Diagram

We purchased a custom off-road trailer to use as a platform to build the perfect overland trailer. We’ve spent the past few years adding an electrical system, a water system, a pull-out kitchen, and a roof rack system to complete the build. In this post, we’ll share the design decisions and wiring diagram of our overland trailer electrical system. To learn more about our overland trailer build, visit the first post in our Outward Overland trailer Series.

Getting Started

Outward Overland Trailer Build Before
The Outward Overland Trailer As We Bought It

We started by calculating our power needs by conducting an energy audit based on our projected electrical needs. To conduct an energy audit, you determine the power draw (in amps) of each electric component in your system and multiply the amount of power of each device by the time per day (in hours) you plan to use it. This gives you a list of projected amp hours (Ah) you’ll use each device per day. Add them together and you have your projected daily Ah usage.

Our list of desired electrical systems included a pressurized water system with hot water, a 12v refrigerator, and lighting throughout the various trailer compartments. Conducting our energy audit on our planned usage, we determined we would use about 20 amp hours of power per day. Our experiences with an airstream trailer in the past confirmed that 20Ah per day was a good target to shoot for.

Planning our 12V Electrical System

Once we had our target daily usage of 20Ah, we could then begin to size our power storage and recharging systems. We determined that an average trip using our overland trailer would be about 3 days – mostly long weekends. 3 days of 20Ah of power usage meant that we needed at least 60Ah of battery storage. When it comes to batteries, more is always better providing the budget and space allow. With that in mind, we upped our desired battery bank size to 100Ah – giving us the potential to spend 5 days out in the wild without needing to recharge.

In terms of recharging our batteries, we first needed a way to recharge them when we returned home to the power grid. We landed on a 10-amp 120V battery charger for recharging the batteries at home. We also wanted the ability to recharge the batteries with solar panels. We calculated that adding around 200 watts of solar would give us between 20Ah to 50Ah of charging capability per day, depending on conditions.

With these numbers, we began purchasing the best components to fit our build.

Main Electrical System Components

Batteries

Batteries are typically the single largest purchase in your electrical system. On a budget, we purchased two 6V 210Ah “golf cart” batteries from Costco. Needing to get these 6V batteries to output 12V, we wired them in series to double the voltage to 12V and keep the amp hours at 210Ah. These golf cart batteries are traditional wet cell deep cycle batteries (not AGM or Lithium Ion) which shouldn’t be discharged to less than 50% of capacity to maintain the health of the battery. So 210Ah at 50% depth of discharge would give us 105Ah of usable power.

To fit the batteries into the front “electrical” compartment in our trailer, we fabricated a battery box out of angle iron and installed tie-down straps to keep them in place.

Battery Monitor
Renogy 500A Battery Monitor with Shunt
The Renogy Battery Monitor and its bright green LCD display in our electrical compartment

To manage our electrical system and to closely monitor our battery capacity while on adventures, it was important for us to install a good battery monitor. We choose Renogy’s 500A Battery Charger with Shunt. It’s inexpensive, monitors power going both in and out of your batteries, and keeps track of your net usage compared to your battery capacity.

To monitor your system’s power usage, the Renogy battery monitor uses a shunt which wires as the first component on the negative side of your battery. To ensure you measure ALL power usage, all charging and discharging devices must be wired behind this shunt.

The shunt then connects to the monitor display via a thin communication cable, which we installed later in the build.

Read our full review of the Renogy 500A Battery Monitor

Battery Disconnect Switch

To have control to shut down our electrical system to work on it or when the trailer is stored for long periods of time, we installed a battery disconnect switch in our system.

Like the battery monitor shunt, the disconnect switch must be wired early in the circuit with all other devices wired behind to ensure all devices can be disconnected from the battery. As you can see on our wiring diagram below, we wired our disconnect switch on the positive side of the battery.

250A System Fuse

Between the battery and the disconnect switch, we added a 250A system fuse on the positive battery terminal. In an event of a short circuit or component malfunction, this fuse will blow protecting the rest of our system. We sized this quite large to allow normal operation to occur without incident.

Bus Bars
travel trailer bus bar electrical wiring
The Wiring & Installation of the Core Electrical Components

Bus Bars, or power distribution blocks, aren’t always necessary but are a convenient way to keep your electrical system installation clean and organized. Bus bars provide multiple mounting posts for components to be wired together and make the installation of larger wires much simpler.

The biggest reason we choose to use both positive and negative bus bars in our build was to create single sources of contact to our disconnect switch on the positive side and our shunt on the negative side. The bus bars allowed to easily wire all other components behind the disconnect and shunt with a single wire between them and the busbar.

Shore Power Charging Components

120V Battery Charging

The term “shore power” comes from the marine industry, referring to a boat or ship being able to plug into the power grid when in port. For camping trailers or RVs, shore power is a 120V power source used for system charging when a connection to the power grid is possible.

For our shore power system, we chose NOCO’s Genius 10 – a simple 10A 120V car battery charger. We installed the NOCO charger into our electrical compartment and wired both positive and negative wires to their respective bus bars.

NOCO 15A AC Waterproof Inlet
With the NOCO plug, we can plug in using a household extension cord in seconds.
Plugging In

Because we installed the shore charger inside our electrical compartment, we needed a way to easily plug in a 120V power cord to charge the system. We installed NOCO’s waterproof 120V plug into the exterior of our electrical compartment and plugged the interior side into the charger. With this setup, we can plug in using a household extension cord in seconds.

With various and automatic charging phases, we can leave the NOCO battery charger plugged in for long periods of time without concern of overcharging or damaging our batteries

System Display/Control Components

12V Switch Panel

To add 12V circuits to separate and protect our various electrical components, we installed a Nilight 5-switch panel with 2 USB charging ports and a 12V “cigarette lighter” port. Protected with a 15A fuse, this panel also includes a voltmeter to verify our system voltage with the Renogy battery monitor.

To wire the panel into the system, we wired its source wires to the busbars, cut a hole into our control panel box and attached the panel via the corner screws.

We currently only use 3 of the switches, leaving 2 additional switches to expand our electrical components in the future. We have switches for our trailer’s led lighting, 12V water pump, and 12V refrigerator. Each of these components can be switched on and off as we need them. Being able to turn individual systems helps to reduce parasitic power waste in each of these systems when they are not in use.

The USB ports also come in handy for charging phones and other small devices while we are at the campsite. We use the 12V “cigarette lighter” port for our air compressor when needed.

Battery Monitor Display

We have the display for our Renogy Battery Monitor installed next to our switch panel and inverter switch in the middle of our electronics compartment. The battery monitor has a large display with adjustable backlighting, allowing easy viewing without having to turn on the lights.

We love that the battery monitor display shows us the net power usage in real-time. It also displays our current battery capacity in both percentage and icon. With the data, we can monitor our power usage closely ensuring we have enough power for the duration of our trip.

Inverter On/Off Switch

Our 1000w inverter has a separate switch installed in our control panel. While this switch we can quickly switch the inverter on when we need it and off when we don’t. Being able to turn the inverter off when we don’t need it avoids a small amount of parasitic power draw that it pulls when switched on. The switch also includes a power led as well as an error led to indicate problems with our inverter.

Overland Trailer Electrical System Control Panel
The Outward Overland Trailer Electrical System Control Panel

120V AC Components

1000W Pure Sine Wave Inverter

When designing our overland trailer electrical system, we chose to add a power inverter to the system. Inverters convert 12V DC power from the batteries to 120V AC power to use with most household devices. Pure sine wave inverters create clean and safe power that can be used for sensitive electronics like computers.

For our trailer, we purchased Renogy’s 1000W Pure Sine Wave Inverter. 1000W gives us enough wattage to use most electronics, but not quite enough to run high-power electronics such as hair dryers, electric kettles, or most heaters. These types of devices use a lot of power and with our desired 20A/day budget, we decided that we didn’t even want the temptation on this trailer. Besides, we planned a propane system on our trailer for cooking and heating.

120V AC RV Outlet
An external AC outlet lets us plug into our inverter power quickly and easily
125A Inverter Fuse

To install our inverter, we wired the inverter’s DC inputs into both busbars and added a 125A fuse inline for added protection. We then ran the small communication cable to the on/off switch on the control panel.

Getting 120V power out

Our inverter has two 120V AC outlets built into its side. Since the inverter is mounted inside our electrical compartment, we installed a waterproof AC outlet to the exterior of our trailer and plugged it into one of the inverter outlets.

Once the inverter is switched on, we can simply plug our AC devices into this plug on the outside of our trailer to get power. The inverter’s second outlet allows us to plug in additional devices to utilize the inverter’s power as needed.

Solar System Components

Solar Panels
Solarland SLP080-12M Multicrystalline 80 Watt 12 Volt Solar Panel
Our 80w slim solar panel sits just above our electrical compartment on the front of our trailer

To recharge our batteries while we’re away from the grid, we looked for the best way to add around 200w of solar panels to our trailer. While the top of our trailer is large and flat, we avoided placing panels on the trailer “lid” due to extra weight and the shadows that our roof rack accessories would cast on the panels. The best placement for a rigid was on the top of our electrical compartment at the front of our trailer. But being only 13 inches deep, typically sized 100w rigid solar panels wouldn’t fit. After a long search, we found an 80w slim rigid solar panel from NAZ Solar Electric.

We installed the 80w slim solar panel using an adjustable mounting system which allows us to adjust the angle of the panel to catch the most amount of sunlight. The cables pass through the roof of our electric compartment using a solar gland to keep water out.

As we didn’t have room to permanently mount all of our solar panels on the roof of our trailer, we purchased a 100w foldable solar suitcase from Renogy to add to our system. This portable solar panel gives us the flexibility of adding more power when we need it and allows us to move and point the 100w panel throughout the day to produce more power.

Now with 180w of solar panels, we purchased a solar parallel adapter cable giving us the ability to connect both panels in parallel with one output to the charge controller. We wired the rigid 80W panel to one end of this cable and connected the other end to a waterproof SAE-style solar input socket mounted to the side of the trailer. The solar input plug adds an easy way to plug in the solar cables from our 100w portable panel when needed.

Solar Charge Controller
Renogy Rover 20A MPPT Charge Controller
Our Renogy Rover Charge Controller sits just above our battery bank

To control the battery charging ability of our solar generation, we chose Renogy’s Rover 20A MPPT Solar Charge Controller. The MPPT controller converts the higher voltage from the parallel wiring of our panels to the best voltage to charge our batteries.

The charge controller is wired to the battery via the positive and negative busbars and also provides multi-phase charging to protect our batteries. We’ve added Renogy’s optional BT-1 Bluetooth adapter which provides the ability to monitor the status of your solar system via a smartphone.

Our controller is mounted just above our batteries in our electrical compartment, which is convenient for the placement of the included battery temperature sensor.

Summary

While we’ll surely add and expand our trailer’s electrical system in the future, planning our system by starting with an energy audit ensured we started on the right track. Our electrical system allows us to spend 5 days in the wild and more if the sun is readily available. It powers our lighting, water system, refrigeration, and device charging while camping without trouble. And when we return, it can be recharged easily and quickly from the grid.

If you are interested in diving deeper into the specific components we used on our build or would like to use our build as inspiration for your own RV, van, or trailer electrical system build, please view our interactive wiring diagram below. You can also download the diagram in pdf format which also includes clickable links for each component.

Interactive Wiring Diagram

Hover/Click on The Components for More Info

Download a PDF of the Outward Trailer Wiring Diagram

Designing a DIY Off Grid Solar System

Renogy 100w flexible panels installed on boat bimini
Adding solar panels to an off-grid electrical system can help extend trips to the outdoors.

These days, a growing number of people are choosing to explore the outdoors in comfort.  Having the luxuries of lighting, refrigeration, and running water can help extend trips in the wild and make them more enjoyable for all.  Whether your outdoor vehicle of choice is an RV, van, boat, travel trailer, or overland trailer like ours, you deserve an electrical system that has enough juice to last as long as you want.  If you are thinking about designing a new off-grid solar system or want to redesign your current vehicle’s system, we can help point you in the right direction.

While every off-grid solar system is different, every system includes the basic components below.  We really love Renogy’s line of electronics and think they match up well with most people building their own DIY off-grid solar system.  We aren’t being paid anything by Renogy to promote their products, we just feel that they offer solid electronics at the best prices and thus have used them almost exclusively in our latest solar system builds.

If you choose to purchase any of the products we’ve highlighted, don’t forget to use coupon code Welcome5 to receive 5% off when purchasing through Renogy.com.

Batteries

Batteries are the heart of an off-grid solar system.  They store the power your solar panels generate for use when the sun isn’t shining. Being the workhorse of your system, they will typically be the most expensive part of your system. Batteries for an off-grid system should be sized according to your daily power need.

Deep Cycle vs Starting Batteries

Standard automotive batteries are built to deliver high-cranking amperage for short periods of time to start your car. Once started, your car’s electrical system depends on your alternator to generate the vehicle’s power needs and to recharge the battery.  Off-grid systems have different needs and thus require different batteries.  Deep cycle batteries are designed to be deeply discharged and recharged regularly and, as a result, are the battery of choice for off-grid solar systems. Deep-cycle batteries will last longer in an off-grid power system and deliver better performance than vehicle-starting batteries.  Motorhomes, vans, and boats typically have both types of batteries on board, while camping or travel trailers typically have only deep-cycle batteries.

Types of Deep Cycle batteries

There are a few main types of deep-cycle batteries available on the market, including flooded lead acid, AGM, and lithium batteries. Flooded lead acid (FLA) batteries are the least expensive but require regular maintenance and shouldn’t be discharged to less than 50% of their capacity. AGM batteries are spill-proof, don’t require maintenance, and can be discharged to 80% of their capacity, but are more expensive than FLA batteries. Lithium batteries have longer lifespans, are also maintenance-free, and can be discharged to 100% without much damage. They are the most expensive battery type, but costs are coming down.

Battery Capacity

Deep cycle batteries have capacity ratings measured in amp hours (Ah).  A 100Ah deep cycle battery can store and deliver 1 amp of power for 100 hours or 1o amps of power for 10 hours. When designing an off-grid solar system, we recommend using Ah to calculate your power usage and your corresponding solar needs.


Renogy Deep Cycle AGM 12 Volt 100Ah Battery, 3% Self-Discharge Rate, 1100A Max Discharge Current, Safe Charge Appliances for RV, Camping, Cabin, Marine and Off-Grid System, Maintenance-Free
Renogy 12V 100Ah LiFePO4 Deep Cycle Rechargeable Lithium Battery, Over 4000 Life Cycles, Built-in BMS, Backup Power Perfect for RV, Camper, Van, Marine, Off-Grid Home Energy Storage, Maintenance-Free
Our Favorite
Renogy 12V 200Ah Lithium LiFePO4 Deep Cycle Battery with Bluetooth,2000+Deep Cycles,Backup Power Perfect for RV,Off-Road,Cabin,Marine,Off-Grid Home Energy Storage
Renogy Deep Cycle AGM Battery 12 Volt 100Ah
Renogy 12V 100Ah Lithium LiFePO4 Deep Cycle Batter
Renogy 12V 200Ah Lithium LiFePO4 Deep Cycle Battery with Bluetooth
Renogy Deep Cycle AGM 12 Volt 100Ah Battery, 3% Self-Discharge Rate, 1100A Max Discharge Current, Safe Charge Appliances for RV, Camping, Cabin, Marine and Off-Grid System, Maintenance-Free
Renogy Deep Cycle AGM Battery 12 Volt 100Ah
Renogy 12V 100Ah LiFePO4 Deep Cycle Rechargeable Lithium Battery, Over 4000 Life Cycles, Built-in BMS, Backup Power Perfect for RV, Camper, Van, Marine, Off-Grid Home Energy Storage, Maintenance-Free
Renogy 12V 100Ah Lithium LiFePO4 Deep Cycle Batter
Our Favorite
Renogy 12V 200Ah Lithium LiFePO4 Deep Cycle Battery with Bluetooth,2000+Deep Cycles,Backup Power Perfect for RV,Off-Road,Cabin,Marine,Off-Grid Home Energy Storage
Renogy 12V 200Ah Lithium LiFePO4 Deep Cycle Battery with Bluetooth


Solar Panels

Solar Panels convert energy from the sun into usable (and storable) power for your system. Solar energy is freely available and is environmentally friendly, making it the power of choice when venturing away from the grid.  When connected to deep-cycle batteries, solar panels recharge the batteries during daylight hours. During the evening when the sun isn’t shining, power is discharged from the power stored in your batteries.  When the sunlight returns, the batteries are recharged again.

The two main types of solar panels are rigid and flexible solar panels.  Rigid solar panels are more efficient, cheaper, and have longer lifespans than flexible panels.  Flexible panels are lighter and can be installed on surfaces that aren’t perfectly flat – like the roof of an Airstream travel trailer or a boat bimini cover. Rigid solar panels offer the best value for standard installations, while flexible panels offer the “flexibility” to add solar in cases where heavy, rigid panels aren’t an option.


Renogy Solar Panel 100 Watt 12 Volt, High-Efficiency Monocrystalline PV Module Power Charger for RV Marine Rooftop Farm Battery and Other Off-Grid Applications, RNG-100D-SS, Single 100W
Our Favorite
Renogy Solar Panel 100W 12V Lightweight Semi Flexible Black Division Monocrystalline Bendable Mono Off-Grid Charger for RV Boat Van Car Uneven Surfaces, LTWT-Flex
Renogy Solar Panel 200W 12V Lightweight Monocrystalline Semi-Flexible Bendable Mono Off-Grid Charger for Marine RV Cabin Van Car Uneven Surfaces
100 Watt 12 Volt Monocrystalline Solar Panel (Compact Design)
100 Watt 12 Volt Black Division Lightweight Monocrystalline Solar Panel
200 Watt 12 Volt Flexible Monocrystalline Solar Panel
Renogy Solar Panel 100 Watt 12 Volt, High-Efficiency Monocrystalline PV Module Power Charger for RV Marine Rooftop Farm Battery and Other Off-Grid Applications, RNG-100D-SS, Single 100W
100 Watt 12 Volt Monocrystalline Solar Panel (Compact Design)
Our Favorite
Renogy Solar Panel 100W 12V Lightweight Semi Flexible Black Division Monocrystalline Bendable Mono Off-Grid Charger for RV Boat Van Car Uneven Surfaces, LTWT-Flex
100 Watt 12 Volt Black Division Lightweight Monocrystalline Solar Panel
Renogy Solar Panel 200W 12V Lightweight Monocrystalline Semi-Flexible Bendable Mono Off-Grid Charger for Marine RV Cabin Van Car Uneven Surfaces
200 Watt 12 Volt Flexible Monocrystalline Solar Panel


Solar Charge Controller

Solar Charge Controllers accept the power from your solar panels and convert it to the appropriate voltage and current (amperage) to best charge your batteries.  They prevent your solar panels from overcharging your batteries – which can drastically reduce their lifespan.

There are two main types of solar charge converters – Pulse Width Modulation (PWM) and Maximum Power Point Tracking (MPPT). PWM charge controllers are less expensive but less efficient than MPPT controllers.  MPPT controllers are more costly but convert much more of the current available from a solar panel to the appropriate voltage for battery charging. MPPT controllers are up to 30% more efficient than PWM controllers – leading to faster battery charging times.


Renogy Voyager 20A 12V/24V PWM Waterproof Solar Charge Controller w/ LCD Display for AGM, Gel, Flooded and Lithium Battery, Used in RVs, Trailers, Boats, Yachts, Voyager 20A
Renogy 30A 12V/24V PWM Solar Charge Controller with LCD Display Flush Mount Design Negative Ground, Compatible with Sealed, Gel, Flooded and Lithium Batteries, Adventurer 30A,black
Our Favorite
Renogy Rover 40 Amp 12V/24V DC Input MPPT Solar Charge Controller Auto Parameter Adjustable LCD Display Solar Panel Regulator fit for Gel Sealed Flooded and Lithium Battery
Renogy Voyager 20A 12V/24V PWM Waterproof Solar Charge Controller
Renogy 30A 12V/24V PWM Solar Charge Controller
Renogy Rover 40 Amp 12V/24V DC Input MPPT Solar Charge Controller
Renogy Voyager 20A 12V/24V PWM Waterproof Solar Charge Controller w/ LCD Display for AGM, Gel, Flooded and Lithium Battery, Used in RVs, Trailers, Boats, Yachts, Voyager 20A
Renogy Voyager 20A 12V/24V PWM Waterproof Solar Charge Controller
Renogy 30A 12V/24V PWM Solar Charge Controller with LCD Display Flush Mount Design Negative Ground, Compatible with Sealed, Gel, Flooded and Lithium Batteries, Adventurer 30A,black
Renogy 30A 12V/24V PWM Solar Charge Controller
Our Favorite
Renogy Rover 40 Amp 12V/24V DC Input MPPT Solar Charge Controller Auto Parameter Adjustable LCD Display Solar Panel Regulator fit for Gel Sealed Flooded and Lithium Battery
Renogy Rover 40 Amp 12V/24V DC Input MPPT Solar Charge Controller


Inverter

Since batteries are typically 12V, most RVs, vans, boats, and travel trailers typically utilize 12V electronics in their design.  With 12V current readily available via the batteries, 12V lighting, water pumps, and appliances are the most efficient.  If you want to bring along some of the comforts of home, the 12V current from your batteries needs to be converted to 120V.  Power inverters are the devices that accomplish this task.

As an example, if you want to install a TV in your RV or charge a laptop for working remotely from your overland trailer, you’ll need an inverter.  When deciding whether you need an inverter, just think of any devices you want to bring along with you that have a typical household plug.

Power inverters are rated by the number of watts they can produce.  When choosing an inverter, you’ll want to determine the maximum amount of 120V watts that you’ll use at one time and size it above that.  For example, if you will only use the inverter to watch TV that uses 70 watts, you’ll want an inverter that produces at least 100 watts of power.  If you bring your 1500-watt electric kettle along with you, you’ll want to make sure you have a 1500w inverter.  As with most elements of an off-grid electrical system, you’ll want to choose an inverter that’s rated for a bit more power than you’ll use to give you some extra headroom.

Inverters aren’t 100% efficient which means that some of the 12V power they convert to 120V gets lost in the process.  And since inverters typically are used for higher-wattage electronics, using your inverter can discharge your battery quickly.  Make sure to consider this when choosing an inverter.


Renogy 700W Pure Sine Wave Inverter 12V DC to 120V AC Converter for Home, RV, Truck, Off-Grid Solar Power Inverter 12V to 110V with Built-in 5V/2.1A USB Port, AC Hardwire Port, Remote Controller
Our Favorite
Renogy 1000W Pure Sine Wave Inverter 12V DC to 120V AC Converter for Home, RV, Truck, Off-Grid Solar Power 110V with Built-in 5V/2.1A USB Port, Hardwire Remote Controller
Renogy 2000W Pure Sine Wave Inverter 12V DC to 120V AC Converter for Home, RV, Truck, Off-Grid Solar Power Inverter 12V to 110V with Built-in 5V/2.1A USB / Hardwire Port, Remote Controller
Renogy 700W Pure Sine Wave Inverter
Renogy 1000W Pure Sine Wave Inverter
Renogy 2000W Pure Sine Wave Inverter
Renogy 700W Pure Sine Wave Inverter 12V DC to 120V AC Converter for Home, RV, Truck, Off-Grid Solar Power Inverter 12V to 110V with Built-in 5V/2.1A USB Port, AC Hardwire Port, Remote Controller
Renogy 700W Pure Sine Wave Inverter
Our Favorite
Renogy 1000W Pure Sine Wave Inverter 12V DC to 120V AC Converter for Home, RV, Truck, Off-Grid Solar Power 110V with Built-in 5V/2.1A USB Port, Hardwire Remote Controller
Renogy 1000W Pure Sine Wave Inverter
Renogy 2000W Pure Sine Wave Inverter 12V DC to 120V AC Converter for Home, RV, Truck, Off-Grid Solar Power Inverter 12V to 110V with Built-in 5V/2.1A USB / Hardwire Port, Remote Controller
Renogy 2000W Pure Sine Wave Inverter


On to the Next Step

Now that we’ve laid out the various components you need to design a DIY off-grid solar system, the next step is to determine how much power your solar system will need to generate and store. To come up with some numbers, you’ll want to do an energy audit of your RV, van, boat, trailer, or other off-grid application.  If you are redesigning an existing system, an energy audit is as simple as determining how much power you use per day.  If you are building a new solar system, you’ll need to project your power usage based on your plans.  Either way, in part 2 of our Off Grid Solar System series, we’ll show you how to conduct an energy audit on your system.

We Tried 3 of the Top Freeze-Dried Backpacking Meals on Amazon

Top freeze dried backpacking meals on amazon
We brought freeze-dried backpacking meals along on outdoor trips we’ve taken the past few weeks to see how easy they are to prepare, how they taste, and how filling they are.

We recently ordered freeze-dried meals from the 3 top brands on Amazon and tested them each to see if freeze-dried food can be any good.  On a recent trip to the outdoors, we brought the meals along to see how easy they are to prepare, how they taste, and how filling they are. Here’s how they stacked up.

In our experience, meals just taste better in the outdoors. Cooking over the campfire while camping is always a memorable experience and car camping can provide the ability to bring an entire kitchen to prepare the outdoor meals of your dreams. But even when you are backpacking and short on space, you deserve a quality, hot meal once you settle in for the evening.

Backpackers are experts at balancing the most calories in the smallest amount of space. They burn thousands of calories each day trekking through the wilderness only carrying what will fit in their pack. Out of necessity, backpackers are kings of food creativity.

Luckily, the outdoor gods have provided a great solution for those venturing outdoors with limited space – freeze-dried meals in a bag.

We were curious if freeze-dried meals were any good.  Sure, they are convenient, but do they do justice to their home-prepared versions? We ordered meals from 3 of the top brands to find out. Within minutes of starting our search, we had a Cuban Rice Bowl from Good To-Go, Pad Thai with Chicken from Mountain House, and Beef Stroganoff from Peak Refuel headed our way.

A few days later, thanks to the magic of Amazon Prime, we had our freeze-dried meals in hand.  We also picked up a portable butane stove and a lightweight pot set to make our tests as authentic to the backpacking experience as possible. We already had a trip to the mountains planned, so we brought the meals along to review.


Good To-Go’s Cuban Rice Bowl


We arrived in the mountains just after dark, unpacked our portable stove, and fired it up. The instructions were easy to read on the back of the package and seemed straightforward. We quickly brought 550ml of water to a boil.  We tore open the top of the Cuban Rice Bowl pouch, poured in the hot water, gave it a quick stir and resealed the package. Per the instructions, we waited 12 minutes, stirred it again, and dug in.

Freeze Dried Backpacking Meal - Good To-Go Cuban Rice Bowl after hydrationHow it looked

Chefs often talk about how you “eat with your eyes first”. Most backpackers don’t care what their meals in a pouch look like, but we do.  So, here’s our visual review.

Our now-hydrated Cuban Rice Bowl looked a lot like we would expect a Cuban Rice Bowl to look.  The black beans, plantains, and tomato flakes provided a nice contrast with the rice.  It looked to have plenty of seasoning with the pepper and cilantro being readily visible. It was a bit more watery than we expected, but for a dehydrated meal, we’d rather have a little too much water than not enough.

How it tasted

Our first taste was filled with lime, pepper, and cilantro flavors – some of our favorites. It has a small bit of spice that really adds to the overall taste.  We could have used more, but as this is for a mass audience, a small amount is probably the right call. The garlic comes through – especially lingering behind in the aftertaste.  It’s not overwhelming so you won’t have to avoid speaking directly to your partner after eating this meal. All of the elements were hydrated well without any crunchy or chewy bits.  We were surprised not to find even a random chuck of plantain that was a tad tough.

This meal from Good To-Go has a ton of flavor.  The drawback to so much flavor is that the plantains, beans, and rice are a bit overwhelmed by it.  Every bit tastes exactly the same.  Nevertheless, we’d more than welcome a hot serving of this Cuban Rice Bowl after a long day outdoors.  In fact, the more we ate of it, the more we enjoyed it. This is a really good vegetarian meal with a lot of protein (30g in the pouch).


Mountain House’s Pad Thai with Chicken

We brought this pouch along on day-trip snowboarding.  At lunch, during a break from the slopes, we set our portable stove up on the tailgate of our truck in the ski resort parking lot. This meal called for only 325ml of water with a 10-minute wait time.

How it looked

Mountain House Pad Thai with Chicken - Freeze dried backpacking mealOpening the pouch after 10 minutes, the pad thai waiting inside was full of color. There are a lot of colorful vegetables in this meal – bell peppers, carrots, and green beans. Like the Cuban Rice Bowl, it’s more watery than a typical plate of Pad Thai. The noodles are cut small – probably to aid in the hydration process.  It only generally looks like Pad Thai, but it does look appetizing.

How it tasted

First of all, Mountain House’s offering smelled really good.  Tired from being on the mountain, we were anxious to dig in. The first taste yielded mild flavors, but it definitely tastes like Pad Thai. It has a good amount of chicken which you can taste in each bite. The small-cut noodles have a good texture and, like the Good To-Go meal, everything in this pouch has rehydrated nicely. Like you’d expect in a good Pad Thai recipe, the unique flavor of the fish sauce comes through in this version. It has a really good flavor that isn’t overwhelming.

As we finish the meal, we don’t find any unmixed bits at the bottom of the pouch, a sign that it’s mixed and rehydrated well. This is a surprisingly good meal – especially from a freeze-dried pouch.  We finish it all and are left wanting more.  This turns out to be our only real problem with this Mountain House Pad Thai – there isn’t enough of it.  While it claims to have 2 servings in the pouch, there are only 480 calories and 20g of protein in the entire pouch.  If this was shared between 2 people as it suggests, the 240 calories per serving it provides won’t get you very far.


Peak Refuel’s Beef Stroganoff

Having been pleasantly surprised by how good the first two freeze-dried meals were, we eagerly tore open the pouch of the Peak Refuel Beef Stroganoff.  Checking the instructions on the back, we were surprised to learn that this meal only calls for 178ml (6oz) of water – half of the water the Mountain House Pad Thai required and a third of the water the Good To-Go Cuban Rice Bowl needed. Only requiring 90 seconds or so to heat up this small amount of water,  this is the quickest meal of the 3 to prepare.

How it looked

Peak Refuel Beef Stroganoff Freeze Dried Backpacking MealAfter 10 minutes and stirring multiple times, what was looking back at us when we opened the pouch wasn’t good.  While the other meals were a bit watery, this meal was clumpy and dry-looking. The beef stroganoff was colorless and looked unappetizing. It looked the least exciting of the 3 meals and it wasn’t close. As a single clump, we couldn’t tell where the noodles ended and the beef started. Undeterred, we dug in.

How it tasted

Chefs must know what they talking about.  We were turned off by the appearance of our newly-hydrated beef stroganoff and the pain only continued as we took our first bites.  We do eat with our eyes, but food that isn’t good probably also doesn’t look very good.

In our opinion, Peak Refuel’s Beef Stroganoff wasn’t good. Its texture was dense and mushy seemingly lacking moisture. If we had a second pouch, we would try using more water in a second run.  Even with added water, we’d prefer to let someone else have the second run because the flavors of this meal also aren’t amazing.  The beef chunks are chewy and the salt in this recipe overwhelms everything else in it. The flavors did improve as we worked deeper into the pouch – a sure sign that it needed more water and more stirring. As we finished the pouch, we discovered some unmixed powder at the bottom.  Using such a small amount of water also meant that this meal wasn’t as hot – something that’s important to us after a long day on the trail. It’s edible, but now that we’ve seen how surprisingly good these freeze-dried meals can be, this one underwhelmed us big time.

Our Conclusions

We knew that freeze-dried backpacking meals are convenient. Heating up water and throwing it in a bag doesn’t get any simpler. But now we know that they can be really good too. We were also surprised when scanning the packages that are seemingly pretty good for you – made with simple and good ingredients.

At $13-15 per pouch on Amazon, these meals aren’t exactly cheap. But the combination of convenience, healthy ingredients, and solid flavor can make them a great value.

Our favorite was the Good To-Go Cuban Rice Bowl – at 1070 calories, it had the most calories per pouch of the meals we tested.  It also tasted really good.  We loved the flavors of cilantro, garlic, and pepper that lingered (in a great way) on our tastebuds after the meal. Its 31g of protein is a good amount – especially for a vegetarian meal.

The Mountain House Pad Thai with Chicken also tasted great, but with only 480 calories and a cost of more than $15, it’s the worst value in the bunch.

The Peak Refuel’s Beef Stroganoff‘s flavor didn’t compare well again the others, but with 810 calories and a whopping 41g of protein, those looking for the best price/gram of protein should consider it.


Have a favorite freeze-dried backpacking meal we should try?  Let us know below in the comments.


Snowboarding in Search of Solitude

Snowboarding at Sunrise Park Resort in Greer, Arizona
Perfect conditions and no lift lines set the tone for my “Search”

The Need for An Escape

This year’s winter storms have been good to our local ski resort. Consistent snowstorms have brought incredible conditions and plenty of fresh powder. It’s been years since I’ve been snowboarding, but with the growing stress at work and home combined with the recent snowstorms, I can hear the mountain calling.

As I leave home for the high country, I feel a cloud of uneasiness. I shouldn’t be doing this. There’s more drama than usual at home. I’m leaving behind unfinished tasks at work. I don’t even know how to set up an out-of-office email. Regardless, I need to disconnect. I need the rush of adrenaline and the freedom my snowboard provides. Those who depend on me may not be happy today, but they will get a better version of me tomorrow… that’s what I keep telling myself at least.

Pulling into the ski resort, I check my phone. I’m still unsure about being unavailable for the day. I take a few moments to respond to emails in a way that hides that I’m not in the office but will take care of anything important by the end of the day.

At the base of the mountain, I strap into my snowboard for the first time in years. It feels better than I had imagined it would. I take a few deep breaths and remind myself how fortunate I am that today my “office” is the mountain. It’s a Wednesday – a slow midweek day for the ski resort – and I have the slopes to myself. I’m excited to spend the day alone on the mountain and to forget about everything else.

View from the top of Sunrise Park Resort in Greer, Arizona
“Each time I reach the top, I make sure to take a few moments to drink in the views.”

Rediscovering Rhythm

All morning, I balance the thrill of each run with the quiet of the lift back to the top. I enjoy the rhythm. I do my best to fully appreciate where I am. Each time I reach the top, I make sure to take a few moments to drink in the views.

As the morning rolls on, I’m proud of myself for avoiding the distractions that undoubtedly await in my pocket. My phone has been vibrating with notifications all morning, but I have resisted checking them. I remind myself that whatever and whoever is jockeying for my attention can wait. The rest of the world will be just fine without me today.

After a few more runs, I can feel my body loosening up and my blood pumping. My once-cold toes are now comfortably toasty. The mountain is becoming familiar again and my confidence is growing.

On the lift, I dig my phone out of my pocket to take a few photos. Unable to completely ignore the long list of notifications waiting for me, I search for anything with an emergency status. I give my wife a quick call to check in. She isn’t feeling well and has called in sick to work. We are both absent from work today, but only I am enjoying myself.

I feel a sudden wave of guilt. Playing hooky from work is one thing, but having fun while my wife is home sick isn’t sitting well with me. I remind myself that there’s nothing I can do and I try to get my mind back on the mountain.

The Dreadlocked Snowboarder

I decide to take a break to refocus. A cold beer by a warm fire should chase away distractions. As I reach the lodge, I’m disappointed to learn that it’s “cash only” today. A fellow boarder at the bar senses my cashless condition and offers to buy me a beer. Appreciative, I recognize that accepting the beer will require me to take a few moments to sit and chat with him.

Between the guy’s long dreadlocks and his endless smile, he looks like he’s got some great stories to tell. Today though, I’m on a mission to do things solo and I politely refuse his offer. I know it’s an asshole move, but solitude sounds better than stories right now. As I leave, he turns his attention to another patron at the bar. I smile as I overhear the beginning of a story involving Shaun White, MDMA, and the Netherlands.

Before heading back to the slopes, I take a detour to check out the lodge. I take my time walking through the various rooms to clear my mind of the demands and responsibilities back home. The only schedule I am on today is my own and it’s liberating.

Riding the Lift at Sunrise Park Resort in Greer, Arizona
Chairlift rides alone provide me time to breathe, think, and process

Having sufficiently purged my mind, I strap back into my board and head for the lift. I’ve been able to ride the lifts alone all morning. These quiet rides up the mountain have been opportunities to think and to process and I’ve enjoyed it. As I approach the lift, I’m looking forward to yet another solitary ride.

A Change of Plans

Just before picking up the lift, my plans change though. Instead of having our own chairs, another guy in line invites me to ride with him. I’d rather ride alone, but I reluctantly join him on the next chair.

Once we both get settled, I look over at my chairmate. Sitting next to me is the dreadlocked snowboarder from the bar. I’m embarrassed that I avoided him earlier, but thankfully, he doesn’t recognize me in my full snowboard gear. I learn that he’s a snowcat operator enjoying the mountain on his day off. He tells me about his long overnight shifts grooming the resort’s runs, the vertigo he sometimes experiences during storms, and his role in keeping the mountain in tip-top shape. He shares that he is also a “snowboarding coach”, and proves it as he shouts tips to boarders as they pass us below. While eccentric, he is a kind soul who authentically cares about those he crosses paths with.

As we talk on the lift, I’m hit with the irony of the situation. I ditch this guy in the bar and minutes later I’m stuck on a chair with him. I’ve been trying my best all day to be alone. He’s been trying to meet everyone on the mountain. I’ve been seeking to escape the entanglements of others. He’s been looking for more connections.

Mushroom Mountain and a Buddy’s Wisdom

He points to a mountain off in the distance. He tells me that it’s his favorite place in the area and that he harvests mushrooms there in the summer. I ask more about the location – how to get there and about the hike to the top. We talk about the barely-visible cell phone tower that a buddy of his works on. As he shares more about his friend’s work, he mentions something that sticks in my mind, “Because my buddy spends so much time on top of mountains, time moves slower for him.”

My mind starts to wander. Can time truly be slowed down? And if it can, does high altitude hold the key? I let the concept linger in my brain for a few more minutes before concluding that “time slowing down” is more likely caused by mind-altering substances than mountaintop experiences. Still, something about the idea continues to rattle around in my consciousness.

Once we reach the top of the mountain, I say goodbye to my new friend. While on the lift together, he had told me about a powder-filled trail on the other side of the mountain. I set off for this rare virgin powder feeling grateful for our time together. Though I am on the mountain to be alone, I’ve enjoyed hearing his perspective on life… and on “time”.

The Sacred Powder Trail

Finding the dreadlocked snowboarder’s powder trail requires a journey across the ski resort to a less-traveled side of the mountain. Locating the run, I take some time to study it from the top. Between deep breaths, I acknowledge my fortune. Just down the hill lies deep, flowing powder touched previously by only a few skiers. The fresh powder beneath me is stunning, but I am also struck by my utter isolation here. The nearby lodge is a ghost town. There are no lifts overhead and no voices to be heard in the distance. A quick 360-degree scan reveals that I am completely alone on this side of the mountain.

Snowboarding at Sunrise Park Resort in Greer, Arizona
“I strap into my snowboard for the first time in years. It feels better than I had imagined it would.”

Undaunted, I whisper a quick “thank you” to the dreadlocked snowboarder and I push off down the hill. The powder is deeper and heavier than I had anticipated. My board disappears beneath me as I carve through the flawless snow. Tired, I have trouble keeping the front of my board above the snow’s surface. I have yet to fall today, but now every movement is a tactic to avoid eating snow.

My descent down the mountain slows as I take frequent breaks to catch my breath. I know that it’s critical to keep my board on top of the deep snow and I’m failing miserably. It quickly becomes clear that I have no business chasing this powder. Unable to sufficiently slow down in these conditions, I need a plan.

Can’t Stop Until The Mountain Stops Me

I notice a narrow snowmobile track down the middle of the run and I head for it. Within the track, the snow is packed just enough to allow me to control my speed. Now committed to staying inside the track, I snake side to side across its slender width.

My speed starts to increase as the slope steepens. Needing to make wider turns, I am forced back into the powder to try to secure an edge. Without warning, my board digs into the deep snow and I am abruptly sent flying over the front of my board. The crash is instantaneous and intense. My face burrows violently into the powder and a cloud of snow envelops me.

I lie there in silence for a few moments. Face down deep in the snow, I see only white. I sit up and take inventory of the situation. Other than my pride, nothing is hurt. I’m caked in snow, but my board and bindings are fine. It was an ugly fall, but thankfully, not a disastrous one.

Rethinking the Search

The quiet reminds me again of how alone I am. I am on a remote side of the mountain on a slow, midweek day. I chose to ride an ungroomed trail that few had dared try before me and not many were likely to follow. If my fall had been serious – if I had been injured or had an equipment failure – there’s a decent chance I would have spent the night on the mountain.

I had been searching for solitude all day. I had ignored countless emails from work. I had relished each chair lift taken alone. I had even declined a free beer to avoid talking with a stranger. On that powder-filled trail, I had found the solitude I had been searching for only to find myself so alone that I was in danger.

After clearing what feels like pounds of snow from my body and board, I determine that this run will be my last of the day. I had pushed this exercise of aloneness as far as I dared.

I ride down to the bottom of the mountain and head for the car. As I pass by the lodge with my board in hand, I look for the dreadlocked snowboarder. I imagine having that beer with him, detailing my nasty fall on the isolated trail, and begging him to tell me more about his theories of “slowing down time.” Unsuccessful in my search, I pack up and head home.

Learning to “Slow Down Time”

The four-hour drive home gives me time to reflect on my experience on the mountain. It felt good to be back on my snowboard and the time alone was renewing. But I am most aware of how much I need others in my life. I need the unexpectedly wise words of strangers to reveal the secrets of life. I need the laughter of others’ insane stories about professional athletes taking party drugs in foreign countries. I need the community of others to avoid disaster and for support when disaster inevitably arrives.

Something about being on the mountain demands reflection. Up here, you can’t help but take regular pauses to remind yourself of where and who you are. Perhaps this is the “slowing down of time” the dreadlocked snowboarder mentioned – mountaintop experiences that force us to rethink our connections and reset our pace.

I want to learn how to “slow time down” during the times of my life when I can’t get to the mountain. I won’t always be able to escape the demands, pressures, and expectations of others, but I can mimic the mountain’s rhythms – regularly pausing, taking a few deep breaths, and appreciating the view. Hopefully, in these “slower” moments, I’ll be better at remembering the role of others in my life and recognizing how grateful I am for the opportunity to share life with them.

Panoramic View of the top of Sunrise Park Resort in Greer, Arizona
Mountaintop experiences force us to rethink our connections and reset our pace.